# Sashimii: full content
> Sashimii cuts your talking-head recording from its transcript, on your Mac. Fix any join to the frame, then finish in Sashimii or in DaVinci Resolve.
Generated: 2026-11-02
---
# Sashimii: The rough cut you wanted, already done.
> Sashimii cuts your talking-head recording from its transcript, on your Mac. Fix any join to the frame, then finish in Sashimii or in DaVinci Resolve.
Canonical: https://sashimii.app/
Sashimii cuts your talking-head recording from its transcript, on your Mac. Fix any join to the frame, then finish in Sashimii or in DaVinci Resolve.
macOS 26 or later · Apple silicon. [Join the Mac beta](https://sashimii.app/beta/).
## How Sashimii Works
1. **Record.** Point Sashimii at the folder. It syncs your recorder’s audio and transcribes on your Mac.
2. **Rough cut.** Your agent picks the takes. Sashimii places every edge on the waveform.
3. **Trim.** Nudge any join by a frame, or keep a beat at the end of a sentence.
4. **Direct.** Select words, press N: text on screen, a diagram, B-roll, a chapter.
5. **Finish.** Render it here, or send separate clips on your original footage to Resolve.
## Five Viewings of the Same Footage, or One
The usual edit watches the video again for every job: cuts, text and graphics, B-roll, review notes, chapters. By the last pass you’re sick of your own face. In Sashimii every decision sits on the transcript, so you make them all on the way through. (On the page this is an illustration of the workflow, not a benchmark.)
## Cut to the Frame
An AI rough cut gets most of the way. Sashimii makes the rest fast: every join sits on the waveform, and every edge is a keystroke from right.
## Your Cut Arrives in Resolve as Real Clips
No flattened render to re-import. Each kept section is its own clip on your original footage, so you can ripple, insert B-roll and grade as if you’d cut it there. Graphics stay editable: change a title’s text in Resolve without going back to Sashimii.
## Details
### Every Join, One at a Time
Review steps through each cut in order. Accept it, nudge it by a frame, or bring the words back.
### Bring Your Own Agent
Your agent drafts the cut and builds the graphics, on the subscription you already have. Switch models whenever a better one ships.
### Notes Become Graphics
Select words, press N, say what should happen there. It lands on the timeline as a draft to approve or send back.
### Chapters While You Watch
Tag a note Chapter as you review. Copy the list for your YouTube description at the end.
## Controls
| Keys | What they do |
| --- | --- |
| ⌘1 | Source: the whole recording |
| ⌘2 | Cut: skip what’s cut |
| ⌘3 | Edit: the cut with its graphics |
| N | Add a note to the selected words |
| A | Approve a graphic |
| ⌥⌘V | Voice cleanup |
## Join the Beta
Testers are invited in small groups, and you’ll get an email when it’s your turn. Transcription runs on your Mac and there’s no account to make. [Join the beta](https://sashimii.app/beta/).
## Related
- [Docs](https://sashimii.app/docs/)
- [Getting started](https://sashimii.app/docs/getting-started/)
- [Updates](https://sashimii.app/blog/)
- [Privacy policy](https://sashimii.app/privacy/)
---
# Join the Sashimii Beta
> Sign up for the Sashimii beta for Mac. Testers are invited in small groups.
Canonical: https://sashimii.app/beta/
Testers are invited in small groups, and you’ll get an email when it’s your turn. Transcription runs on your Mac and there’s no account to make.
The signup form on this page asks for your email address, your Mac and AI-agent setup and, optionally, a link to your channel. Your answers help pick who to invite first. It runs on macOS 26 or later · Apple silicon.
The form needs a browser: open the page to sign up. How signups are handled is in the [privacy policy](https://sashimii.app/privacy/).
## Related
- [Beta terms](https://sashimii.app/beta-terms/)
---
# Sashimii Docs
> How to set up a recording in Sashimii, get a first draft from your agent, review the cut and export it.
Canonical: https://sashimii.app/docs/
Last updated: 2026-11-02
Sashimii is a Mac app for rough cuts of spoken recordings: talking-head video, or audio on its own. It splits the work in two:
- **The transcript decides what is cut.** Your AI agent (Claude Code or Codex) reads the transcript and picks the takes, using the Sashimii skill and command-line tool.
- **The waveform decides where.** Sashimii moves every cut edge onto the audio, so joins land between words, not inside them.
Then you review the cut in Sashimii: step through every join, fix any edge to the frame, leave notes for your agent, and export a video file or an editable timeline for DaVinci Resolve.
## The Short Version
1. Choose **File › New Project from Folder…** and pick the folder with your recording. Sashimii transcribes it on your Mac.
2. In Claude Code or Codex, type `check Sashimii`. Your agent drafts the cut.
3. Open the project, press R and review each join.
4. Press ⌘ E to export.
New to Sashimii? Start with [Getting Started](https://sashimii.app/docs/getting-started/).
## For AI Agents
Every page here has a Markdown version: add `.md` to its URL (this page is [/docs.md](https://sashimii.app/docs.md)). [/llms.txt](https://sashimii.app/llms.txt) lists them all, and [/llms-full.txt](https://sashimii.app/llms-full.txt) has every page in one file. If you are an agent helping someone use Sashimii, read [For Agents](https://sashimii.app/docs/for-agents/) first.
## Start Here
- [From the Download to Your First Rough Cut](https://sashimii.app/docs/getting-started/): Install Sashimii, set up your first project and get your agent's first rough cut.
- [Setting Up a Project](https://sashimii.app/docs/projects/): Turn a folder holding your recording into a Sashimii project, with a separate recorder file, a Style and voice cleanup if you want them.
- [Drafting with Your Agent](https://sashimii.app/docs/drafting-with-your-agent/): How your AI agent drafts the rough cut with the Sashimii skill, what it changes, and how to connect it so it starts by itself.
## Editing
- [Finding Your Way Around](https://sashimii.app/docs/the-window/): The parts of a Sashimii project window, the Source, Cut and Edit views, and how to play, move the playhead and zoom the timeline.
- [Cutting and Restoring Words](https://sashimii.app/docs/cutting/): Cut and restore words from the transcript or the timeline, answer the pauses and cuts Sashimii flagged, and move a cut edge by hand.
- [Reviewing Joins](https://sashimii.app/docs/reviewing-joins/): Step through every join in the cut at frame zoom, listen across it, fix its edges and accept it.
- [Notes and Directions](https://sashimii.app/docs/notes/): Leave notes on words or ranges, tag them with what should happen there, and hand them to your agent through the agent queue.
- [Edit View and Graphics](https://sashimii.app/docs/edit-view-and-graphics/): Watch the cut as one continuous timeline, adjust joins from it, and move, retime, approve or send back the graphics your agent made.
- [Voice Cleanup](https://sashimii.app/docs/voice-cleanup/): Clean up background noise and room echo in your voice, preview the result against the original, and choose how much to apply.
## Finishing
- [Exporting](https://sashimii.app/docs/exporting/): Render the cut as an MP4, export it to DaVinci Resolve as an editable timeline on your original footage, or write an audio project's cut as a WAV.
- [YouTube Chapters](https://sashimii.app/docs/chapters/): Mark chapters while you review by tagging notes, see them in Edit view, and copy the chapter list for your YouTube description.
- [Styles](https://sashimii.app/docs/styles/): Make a visual Style for your graphics by picking from options your agent shows over your own footage, then use it in every project.
- [Audio Projects and Voiceover Videos](https://sashimii.app/docs/audio-and-voiceover/): Cut a podcast, lesson or other audio-only recording, export it as a WAV, or turn it into a voiceover video with graphics.
## Reference
- [Keyboard Shortcuts](https://sashimii.app/docs/keyboard-shortcuts/): The keyboard shortcuts in Sashimii, for playback, cutting, join review, notes, graphics and export.
- [For Agents](https://sashimii.app/docs/for-agents/): What an AI agent needs to help someone with Sashimii, the skill, the sashimii command-line tool, the project files, and the rules for changing them.
## Related
- [From the Download to Your First Rough Cut](https://sashimii.app/docs/getting-started/)
---
# Sashimii Updates
> What’s new in Sashimii: releases, new features and notes on how it works.
Canonical: https://sashimii.app/blog/
Last updated: 2026-10-26
- [Style Studio](https://sashimii.app/blog/style-studio/) (26 October 2026): Make a visual style for your videos by picking from options shown over your own footage, then let your agent design every graphic to match.
- [Cleaner Voice in One Switch](https://sashimii.app/blog/voice-cleanup/) (21 October 2026): Voice cleanup takes background noise and room echo out of your recording, on your Mac, with the original always one switch away.
- [Notes: Talk to Your AI Agent From the Timeline](https://sashimii.app/blog/notes-for-your-agent/) (20 October 2026): Leave notes on the words in your video, and your own AI agent turns them into graphics, captions and zooms you can review and send back in Sashimii.
- [A Faster Way to Get the Rough Cut Right](https://sashimii.app/blog/first-test-version/) (15 October 2026): Sashimii started as one small tool with one job, getting the rough cut of a talking-head video right without a trip through a full editor.
## Related
- [RSS feed](https://sashimii.app/rss.xml)
---
# From the Download to Your First Rough Cut (Sashimii Docs, Start Here)
> Install Sashimii, set up your first project and get your agent's first rough cut.
Canonical: https://sashimii.app/docs/getting-started/
Last updated: 2026-11-02
Sashimii sets up your recording on your Mac, your agent drafts the cut, and you review it in Sashimii. This page walks through the first run.
## What You Need
- A Mac with Apple silicon, on macOS 26 or later.
- About 1 GB of free disk space for the speech model, which Sashimii downloads once.
- An agent that can use skills: Claude Code or Codex.
## 1. Install Sashimii
Open the disk image and drag Sashimii onto the Applications folder. Then open it from Applications.
If you open it straight from the disk image, the welcome window asks you to move it first: updates and the command-line tool don’t work from there.
## 2. The Welcome Window
The first time Sashimii opens, the welcome window shows three things to get done.
### Speech Model
The download starts by itself. Sashimii transcribes on your Mac, so this is the only time it needs the model from the internet. If the download stops, click **Try Again**.
### Install the Agent Skill
Click **Install…** to install two things your agent uses:
- the command-line tool, linked at `~/.local/bin/sashimii`
- the Sashimii skill, copied to `~/.claude/skills/sashimii` for Claude Code and `~/.agents/skills/sashimii` for Codex
If `~/.local/bin` isn’t on your PATH yet, the confirmation offers **Copy PATH Line**. Paste that line into your shell profile (usually `~/.zshrc`).
You can run the same install later from the Sashimii menu: **Install Command-Line Tool and Agent Skill…** Run it again after an update to refresh the skill.
### First Project
This one ticks itself off when you set up your first recording, below.
## 3. Set Up Your First Project
Choose **File › New Project from Folder…** (⌘ N), pick the folder that holds your recording, and click **Set Up**.
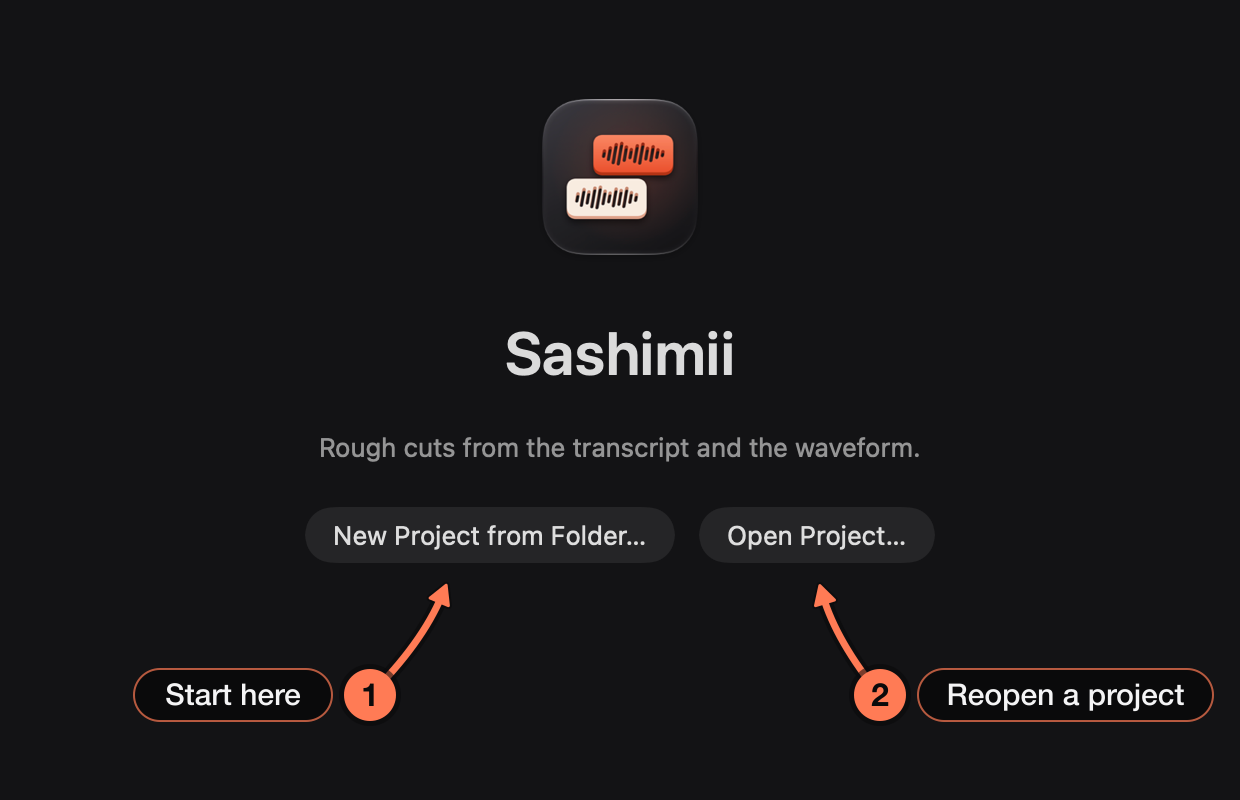
1. **New Project from Folder…** sets up a recording.
2. **Open Project…** opens one you set up before. Recent projects are listed below the buttons.
Nothing in the folder changes until setup finishes. Then the project is saved there, next to your recording, as a `.sashimii` file. Setup transcribes the recording and reads its waveform, and shows each step as it goes. [Setting Up a Project](https://sashimii.app/docs/projects/) explains the choices on the setup screen.
## 4. Tell Your Agent: Check Sashimii
When setup shows **Project ready**, go to your agent’s chat (Claude Code or Codex) and type:
```
check Sashimii
```
Your agent looks for projects waiting for a draft and starts on yours. If more than one is waiting, it asks which. When it’s done, open the project in Sashimii to review the cut.
No skill installed, or an agent that can’t use skills? Click **Copy Request** on the Project ready card and paste the request into your agent instead.
## 5. Optional: Connect Your Agent
You don’t need this for a first draft. A connected agent can wait while setup runs and start the moment it finishes, and Sashimii shows it as connected. See [Drafting with Your Agent](https://sashimii.app/docs/drafting-with-your-agent/#connect-your-agent).
## Updates, Feedback and Support
Updates arrive in the app. Sashimii checks for them on its own, and **Sashimii › Check for Updates…** checks right away.
Found a bug, have an idea or need help? Post it on [sashimii.userjot.com](https://sashimii.userjot.com).
## Removing Sashimii
Sashimii can’t undo its own setup yet, so here is what to remove by hand. Run only the lines for the parts you installed.
Quit Sashimii, then move it from Applications to the Trash. Then remove the command-line tool and the skills:
```
rm -f ~/.local/bin/sashimii
rm -r ~/.claude/skills/sashimii
rm -r ~/.agents/skills/sashimii
```
If you connected Claude Code, remove the connection:
```
claude mcp remove --scope user sashimii
```
If you connected Codex, open `~/.codex/config.toml` and delete the `[mcp_servers.sashimii]` table with the lines under it.
The speech model and app data are in these folders:
```
rm -r ~/Library/Application\ Support/Sashimii
rm -r ~/Library/Caches/Sashimii
```
To remove its preferences (recent projects, export choices, panel sizes) too:
```
defaults delete com.shanemelaugh.Sashimii
```
Your projects stay where you made them, as `.sashimii` files next to your recordings. Styles you made are in `~/Documents/Sashimii/Styles`. Delete those yourself if you don’t want them.
## Related
- [Sashimii Docs](https://sashimii.app/docs/)
- [Setting Up a Project](https://sashimii.app/docs/projects/)
---
# Setting Up a Project (Sashimii Docs, Start Here)
> Turn a folder holding your recording into a Sashimii project, with a separate recorder file, a Style and voice cleanup if you want them.
Canonical: https://sashimii.app/docs/projects/
Last updated: 2026-11-02
A Sashimii project starts from a folder: the one that holds your recording. Choose **File › New Project from Folder…** (⌘ N) and pick it.
## What the Folder Can Hold
- **One video**, and at most **one separate audio file**, such as a WAV from an external recorder. This makes a video project.
- **One audio file and no video** (WAV, AIFF, M4A, MP3, CAF or FLAC). This makes an audio project, for a podcast, a lesson or a voiceover. See [Audio Projects and Voiceover Videos](https://sashimii.app/docs/audio-and-voiceover/).
If the folder holds several videos or several audio files, Sashimii asks which ones to use. A folder with no video or audio, or one that already has a project in it, is refused with a message saying why, and nothing is written.
## The New Project Screen
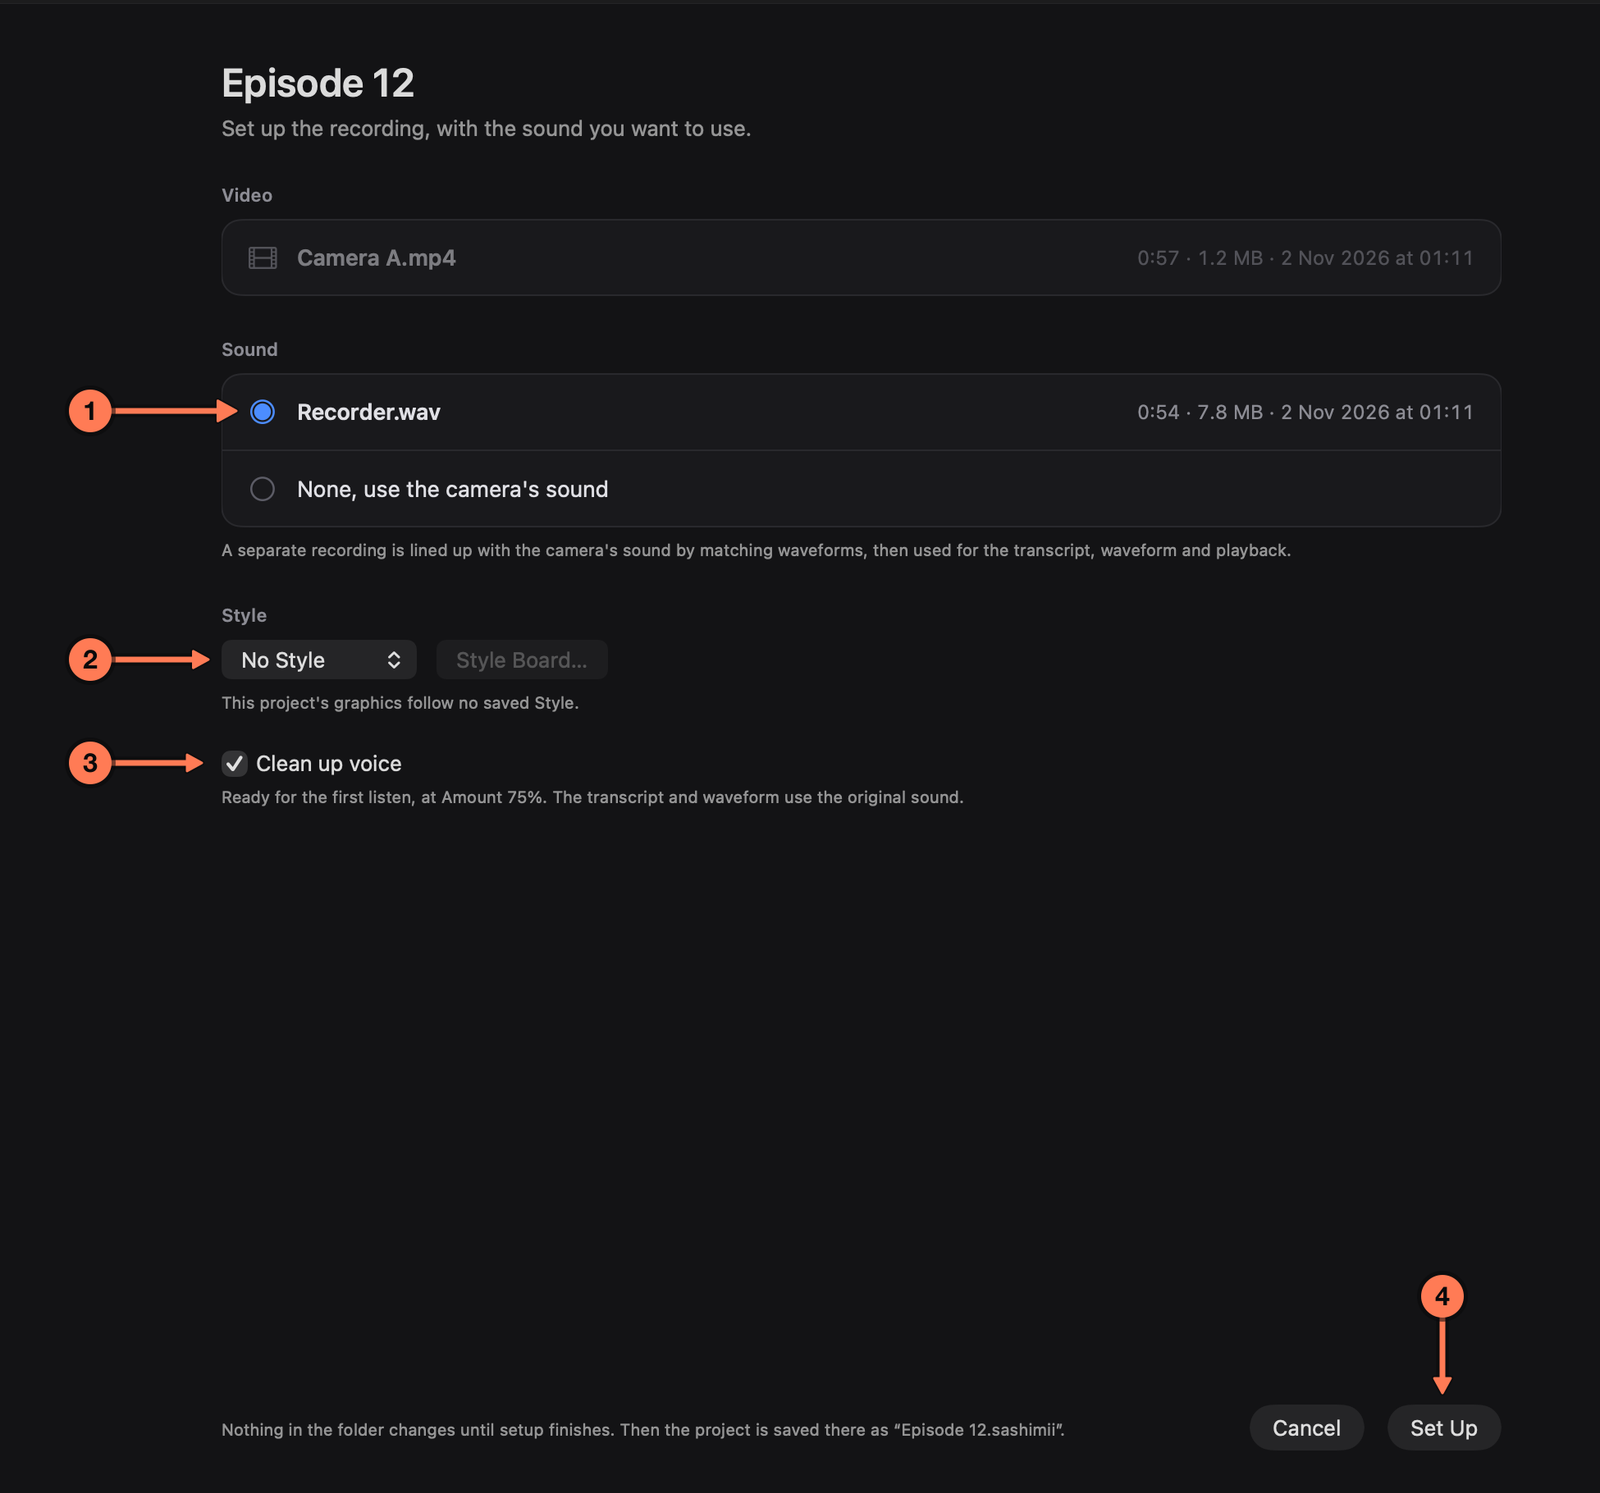
1. **Sound.** Choose the separate recording, or **None, use the camera’s sound**.
2. **Style.** The look your graphics follow. **No Style** is fine for a first cut; see [Styles](https://sashimii.app/docs/styles/).
3. **Clean up voice.** On by default.
4. **Set Up** starts setup. Nothing is written until you press it.
## What Setup Does
Setup shows each step as it runs:
1. **Media.** It reads the video’s frame rate and length.
2. **Audio sync**, when you chose a separate recording. Sashimii lines it up with the camera’s sound by matching their waveforms, and checks the match at the start, middle and end. From then on the separate recording is the project’s sound: transcript, waveform and playback. If the file doesn’t match the video, or drifts out of sync, setup stops and says so. It never guesses the offset. Choose the camera’s sound instead, or move the file out of the folder.
3. **Transcription**, on your Mac. Words appear as each chunk finishes.
4. **Waveform.** One audio level for every frame.
5. **Missed speech.** Where the waveform hears speech that no word covers, that stretch is transcribed again on its own.
6. **Voice cleanup**, unless you turned it off. The transcript and waveform still use the original sound. If cleanup fails, setup still finishes with the original sound and tells you why.
The project is built in a temporary folder and moved into place when every step is done, so a cancelled or failed setup leaves your folder as it was. The finished project sits beside your recording as `.sashimii`. Finder shows it as one file; double-click it to open it.
There is no AI step in setup. When it finishes, it shows **Project ready** and the request to give your agent. Next: [Drafting with Your Agent](https://sashimii.app/docs/drafting-with-your-agent/).
## Your Recording Is Never Changed
A project points at your recording; it doesn’t copy, move or re-encode it. Sashimii saves every change to the project within half a second and keeps the last 100 versions of each project file in the project’s `cache/history/` folder.
## Related
- [From the Download to Your First Rough Cut](https://sashimii.app/docs/getting-started/)
- [Drafting with Your Agent](https://sashimii.app/docs/drafting-with-your-agent/)
---
# Drafting with Your Agent (Sashimii Docs, Start Here)
> How your AI agent drafts the rough cut with the Sashimii skill, what it changes, and how to connect it so it starts by itself.
Canonical: https://sashimii.app/docs/drafting-with-your-agent/
Last updated: 2026-11-02
Sashimii doesn’t pick the takes itself. Your own agent does, on the subscription you already have: Claude Code or Codex, using the Sashimii skill and command-line tool. Install both from the welcome window, or later with **Sashimii › Install Command-Line Tool and Agent Skill…** ([Getting Started](https://sashimii.app/docs/getting-started/#install-the-agent-skill)).
## Ask for a Draft
In your agent’s chat, type:
```
check Sashimii
```
Your agent runs `sashimii check`, which lists what is waiting: projects set up with no cut yet, open notes, and Style requests. It starts on yours, or asks which one if several are waiting.
You can also name the project, or copy the request: **Copy Request** on the Project ready card copies a ready-made request to paste into any agent.
## Tell It Your Rules
What counts as a retake, which repeats are on purpose, and which pauses and breaths stay is your call. Tell your agent in the chat, or point it to a file of your rules. Where you say nothing, the skill’s defaults apply:
- Keep the last clean, complete take of anything said more than once.
- Cut stumbles, restarts and asides not meant for the audience.
- Cut everything before the first kept word and after the last.
- Cut nothing just for length, and keep repeats that sound deliberate.
- When unsure, keep it and leave a note.
## What Your Agent Does
1. It writes a small file saying it is drafting. While it’s there, a banner across the project window says so.
2. It reads the whole transcript, then names each cut by its first and last word. The command-line tool works out the frames.
3. It leaves a note for every judgement call, such as a take it wasn’t sure about.
4. It runs the edge pass, which moves every cut edge onto the waveform, cuts long pauses and flags borderline ones for you.
5. It removes the banner file. The banner then says the draft is ready, with the cut length and the number of notes.
6. It reports the length before and after, the cuts by kind, and its notes in the order to check them.
For a draft, your agent writes only the cut, its notes and the banner file, plus graphics when the project has a Style, all inside the project. It never touches your recording or the transcript. You can keep the project open while it works: Sashimii reloads the files when they change, and keeps your unsaved changes on top.
## Then Review It
Open the project (it may already be open) and work through the draft: [Finding Your Way Around](https://sashimii.app/docs/the-window/), then [Reviewing Joins](https://sashimii.app/docs/reviewing-joins/). Notes your agent left show in teal; yours show in gold.
To send more work back, leave notes and use the agent queue: [Notes and Directions](https://sashimii.app/docs/notes/).
## Connect Your Agent
Optional: the skill works without it. A connected agent can wait while setup runs and start the moment it finishes, and Sashimii shows it as connected.
`sashimii register claude-code codex` registers Sashimii’s server with Claude Code, Codex or both, in each one’s user settings. It changes nothing else, and it never takes over a Sashimii entry it didn’t write: it says so and prints the commands instead. `sashimii register manual` only prints the commands, for you to run yourself.
Registered isn’t the same as connected: the agent connects when it next starts.
## Graphics
When a note asks for something on screen, such as text, a lower third or a chapter title, your agent can build it as a graphic in the project. See [Edit View and Graphics](https://sashimii.app/docs/edit-view-and-graphics/) and [Styles](https://sashimii.app/docs/styles/).
## Related
- [Setting Up a Project](https://sashimii.app/docs/projects/)
- [Finding Your Way Around](https://sashimii.app/docs/the-window/)
---
# Finding Your Way Around (Sashimii Docs, Editing)
> The parts of a Sashimii project window, the Source, Cut and Edit views, and how to play, move the playhead and zoom the timeline.
Canonical: https://sashimii.app/docs/the-window/
Last updated: 2026-11-02
A project window has three parts: the transcript on the left, the video on the right, and the timeline along the bottom.
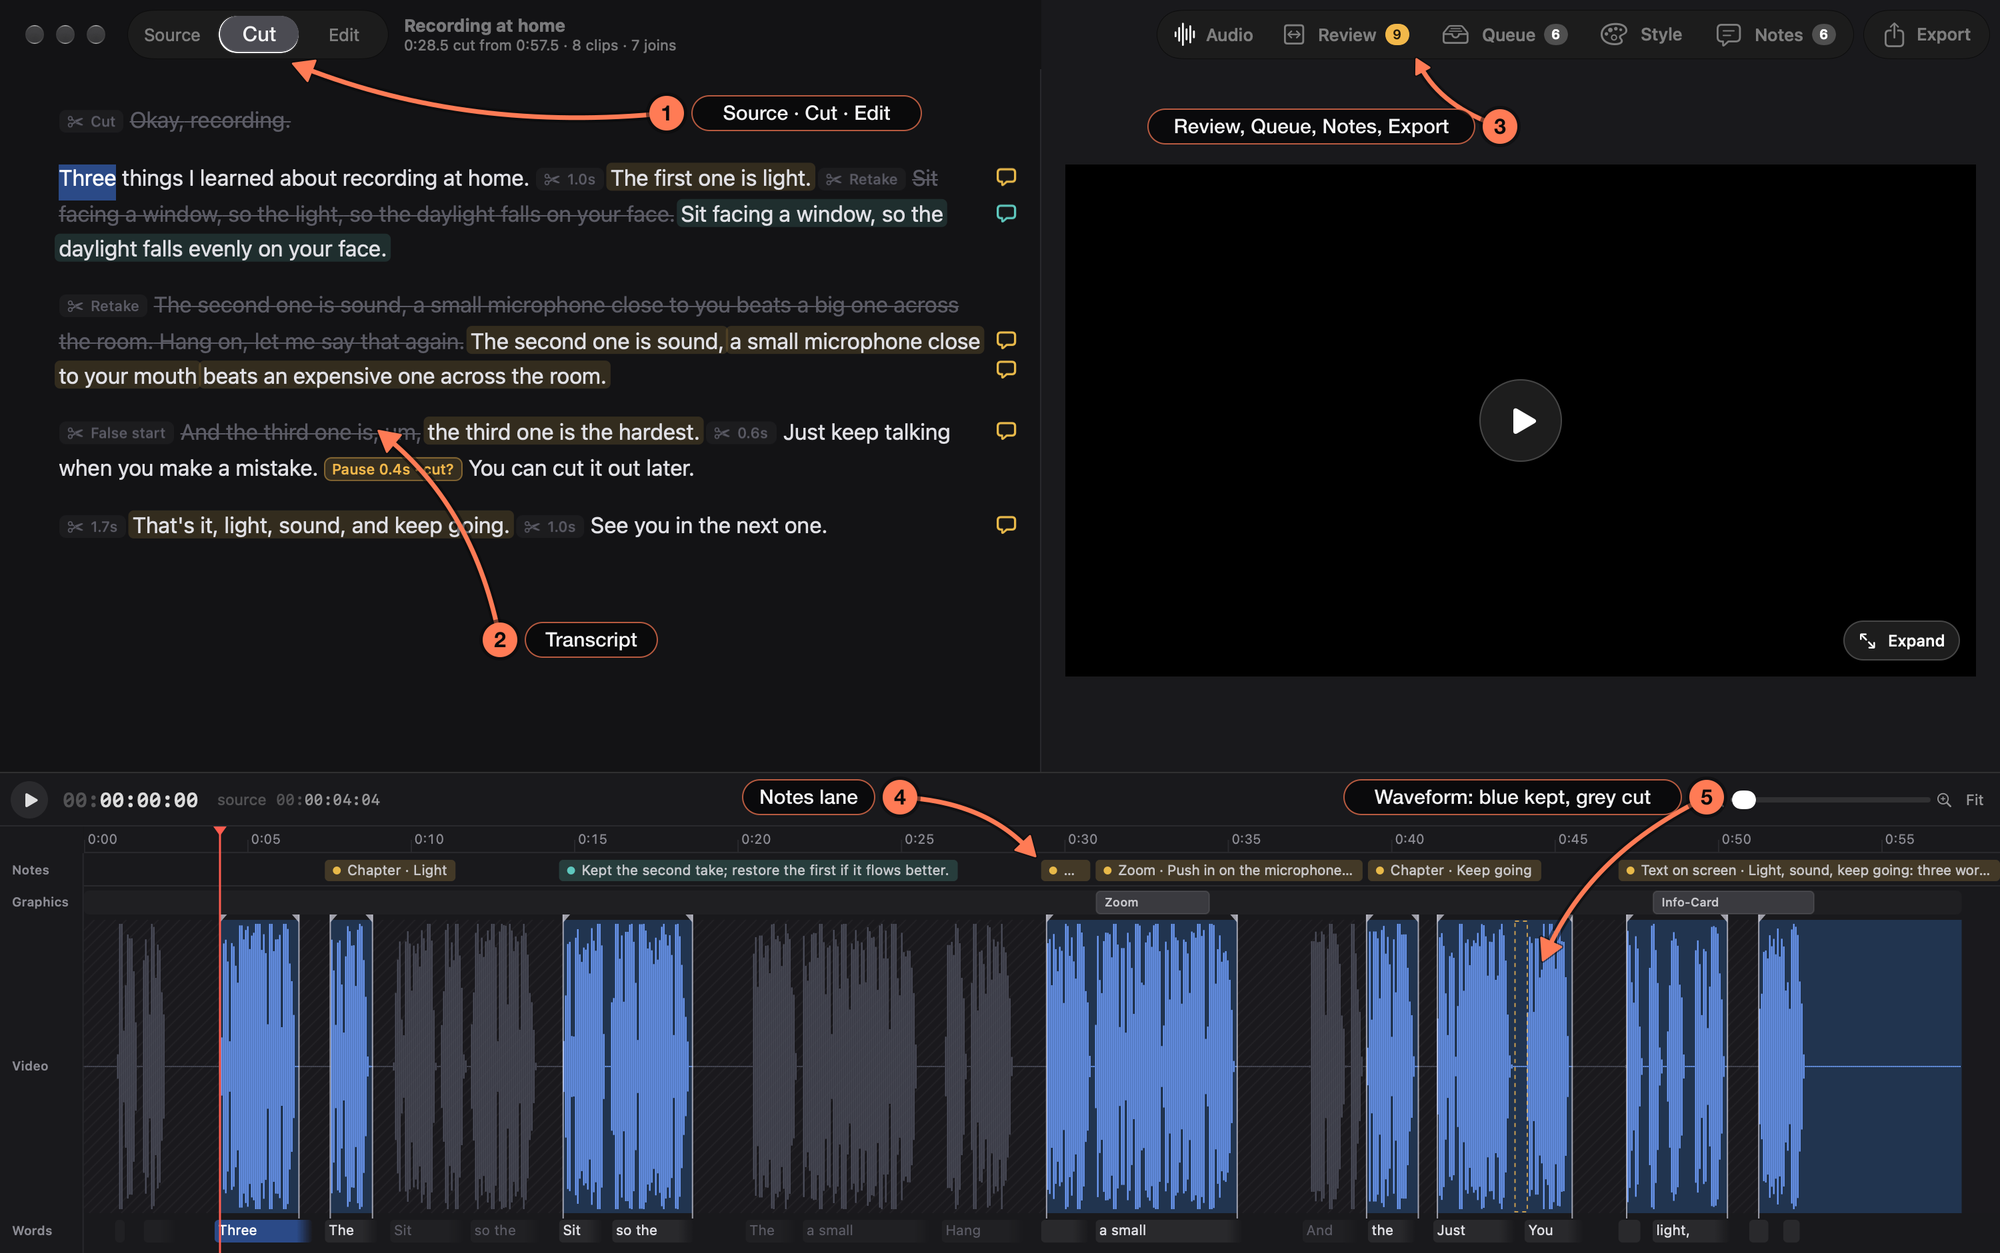
1. **Source, Cut and Edit** choose what plays and shows (below).
2. **The transcript.** Cut words are struck through, with a label saying why: Retake, False start, Pause, Cut. Click a word to play from it.
3. **The toolbar.** Audio (voice cleanup), Review (join review, with the number of joins left to review), Queue (work for your agent), Style, Notes and Export.
4. **The Notes lane.** Every note, chapter and direction, at its place in the recording.
5. **The waveform.** Kept clips are blue; cut parts are grey. The small handles at each clip’s ends are its cut edges.
The title bar shows the project’s name, the cut’s length against the recording’s, and how many clips and joins it has.
## Source, Cut and Edit
| View | Keys | What it shows |
| --- | --- | --- |
| Source | ⌘ 1 | The whole recording plays, cut words included. Cut words show plain and grey. |
| Cut | ⌘ 2 | Playback skips the cuts. Cut words are struck through, and the timeline shows the whole recording. This is the place for cutting. |
| Edit | ⌘ 3 | The cut as one continuous timeline, with its graphics. The transcript leaves cut words out. See [Edit View and Graphics](https://sashimii.app/docs/edit-view-and-graphics/). |
A project opens in Cut. E switches between Cut and Edit. The view stays as you picked it while you click, seek and play.
## Playing and Moving Around
- **Play or pause:** Space.
- **Play from a word:** click it. In Cut view, clicking a cut word plays the source so you can hear it.
- **Move the playhead:** click the timeline, or drag the playhead by its line or its head. The video and transcript follow while you drag.
- **Step:** ← → move one frame; with Shift, one second. Home and End jump to the start and end.
## Zooming and Scrolling the Timeline
- **Zoom around the pointer:** pinch, or ⌘-scroll.
- **Zoom around the playhead:** = and -, or the zoom slider above the timeline.
- **Fit the whole recording:** **Fit**, or ⌘ 0.
- **Scroll:** swipe with two fingers or use the scroll wheel; Option-drag pans. Zoomed in, a scroll bar shows along the bottom edge.
## A Bigger Video
Drag the line between the transcript and the video to give the video more room; double-click the line to put it back. **Large Preview** (⌥ F, or **Expand** on the video) hides the transcript and keeps the timeline. Press ⌥ F or Esc to return.
## Undo
⌘ Z undoes and ⇧ ⌘ Z redoes, for cuts, edges, notes and graphics.
## Related
- [Drafting with Your Agent](https://sashimii.app/docs/drafting-with-your-agent/)
- [Cutting and Restoring Words](https://sashimii.app/docs/cutting/)
---
# Cutting and Restoring Words (Sashimii Docs, Editing)
> Cut and restore words from the transcript or the timeline, answer the pauses and cuts Sashimii flagged, and move a cut edge by hand.
Canonical: https://sashimii.app/docs/cutting/
Last updated: 2026-11-02
Every cut in Sashimii is a stretch of the recording taken out. You make and undo them from the transcript or the timeline, and Sashimii places the edges on the waveform for you.
## Cut Words
Select words in the transcript and press Delete. The cut’s edges land on the waveform, between words.
When you select words, or drag a range on the timeline, a small popover above them offers **Cut** when it holds kept words, **Restore** when it holds cut words (not in Edit view), and **Add Note…**. The keys keep working while it shows.
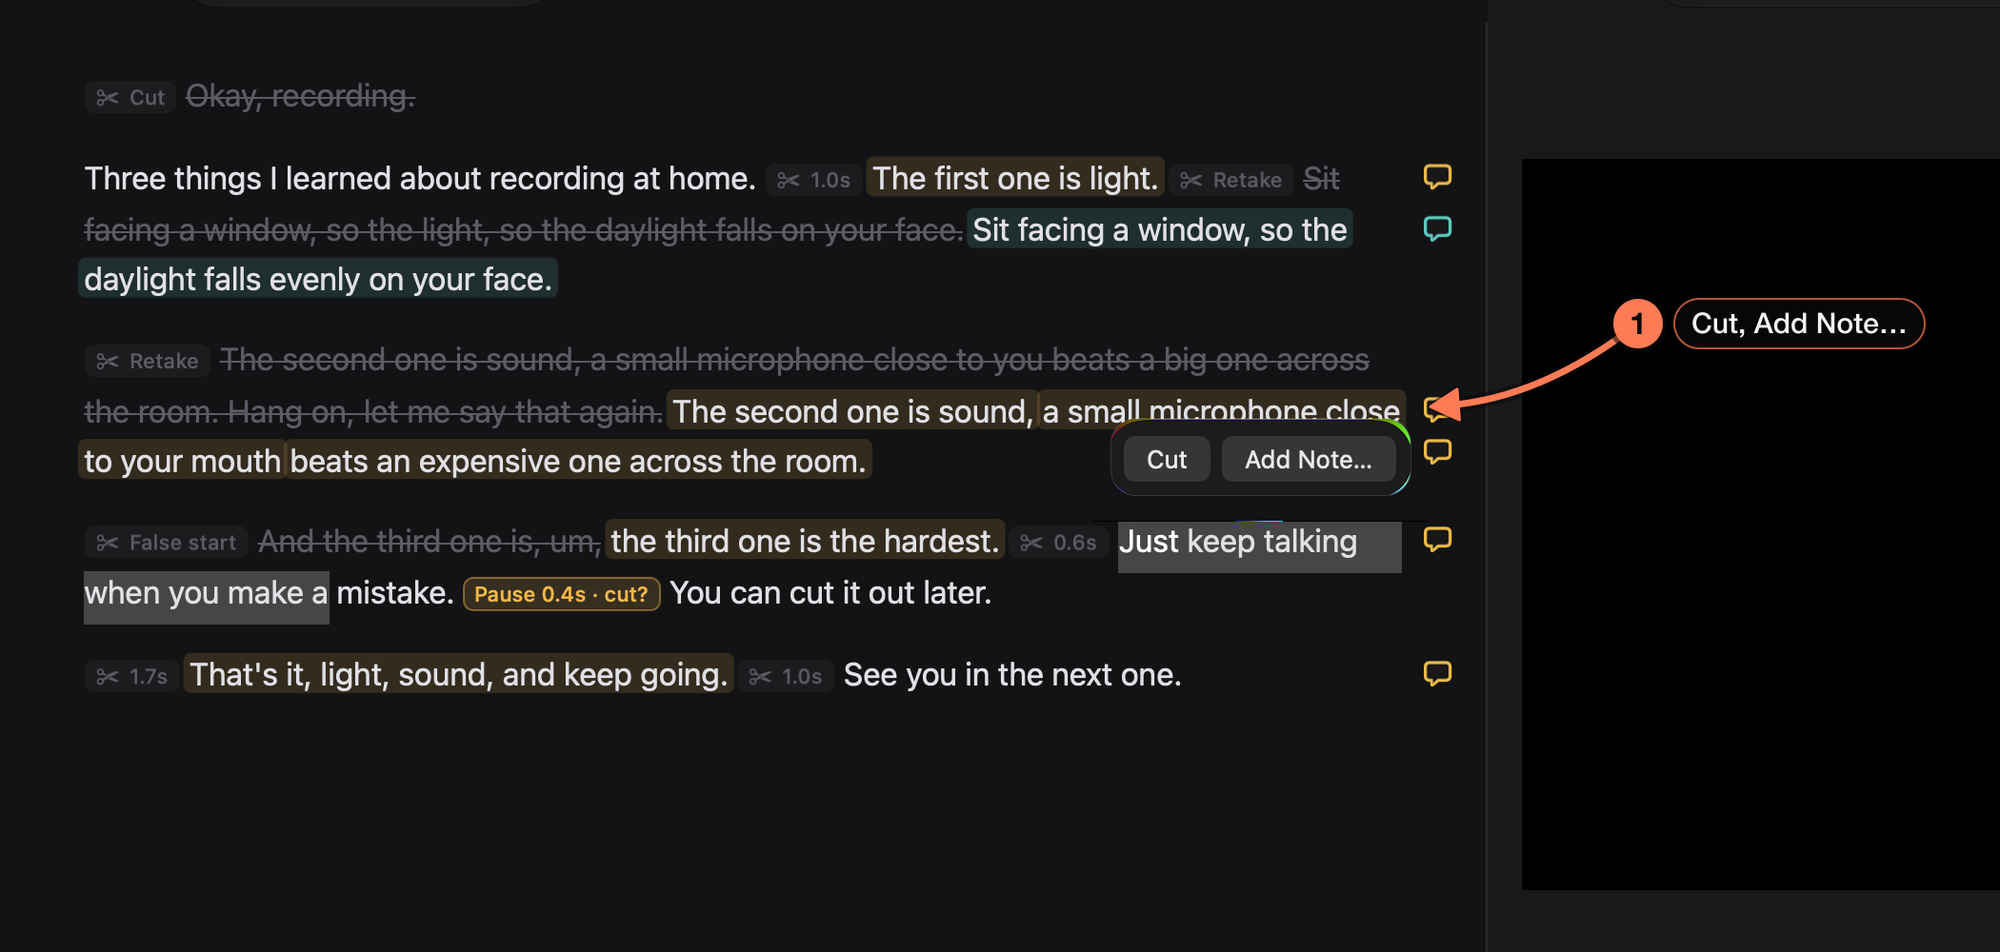
1. **The selection popover**, just above the selected words.
## Restore Words
Select struck-through words and press Delete or ⇧ Delete. They come back into the cut.
## Cut on the Timeline
- **A range:** drag across the clips (not the ruler or the playhead), then press Delete.
- **A whole clip:** double-click it, then press Delete. The cuts on either side become one join; their outer edges don’t move.
- **Words:** click a word chip under the waveform (Shift-click to extend). The transcript selects them too.
## Answer a Kept Pause or a Flagged Cut
The edge pass leaves some calls to you, and marks them in the flag colour:
- **A kept pause**, such as “Pause 0.4s · cut?”: a pause it wasn’t sure about cutting.
- **A flagged cut**: a cut that might have taken something you want.
Click its chip in the transcript, or click it on the timeline in Source view. **Cut** and **Keep** show above it. For a kept pause, Cut cuts it and Keep keeps it. For a flagged cut, Cut keeps the cut and Keep brings the words back. Either answer clears the flag, as one undo step.
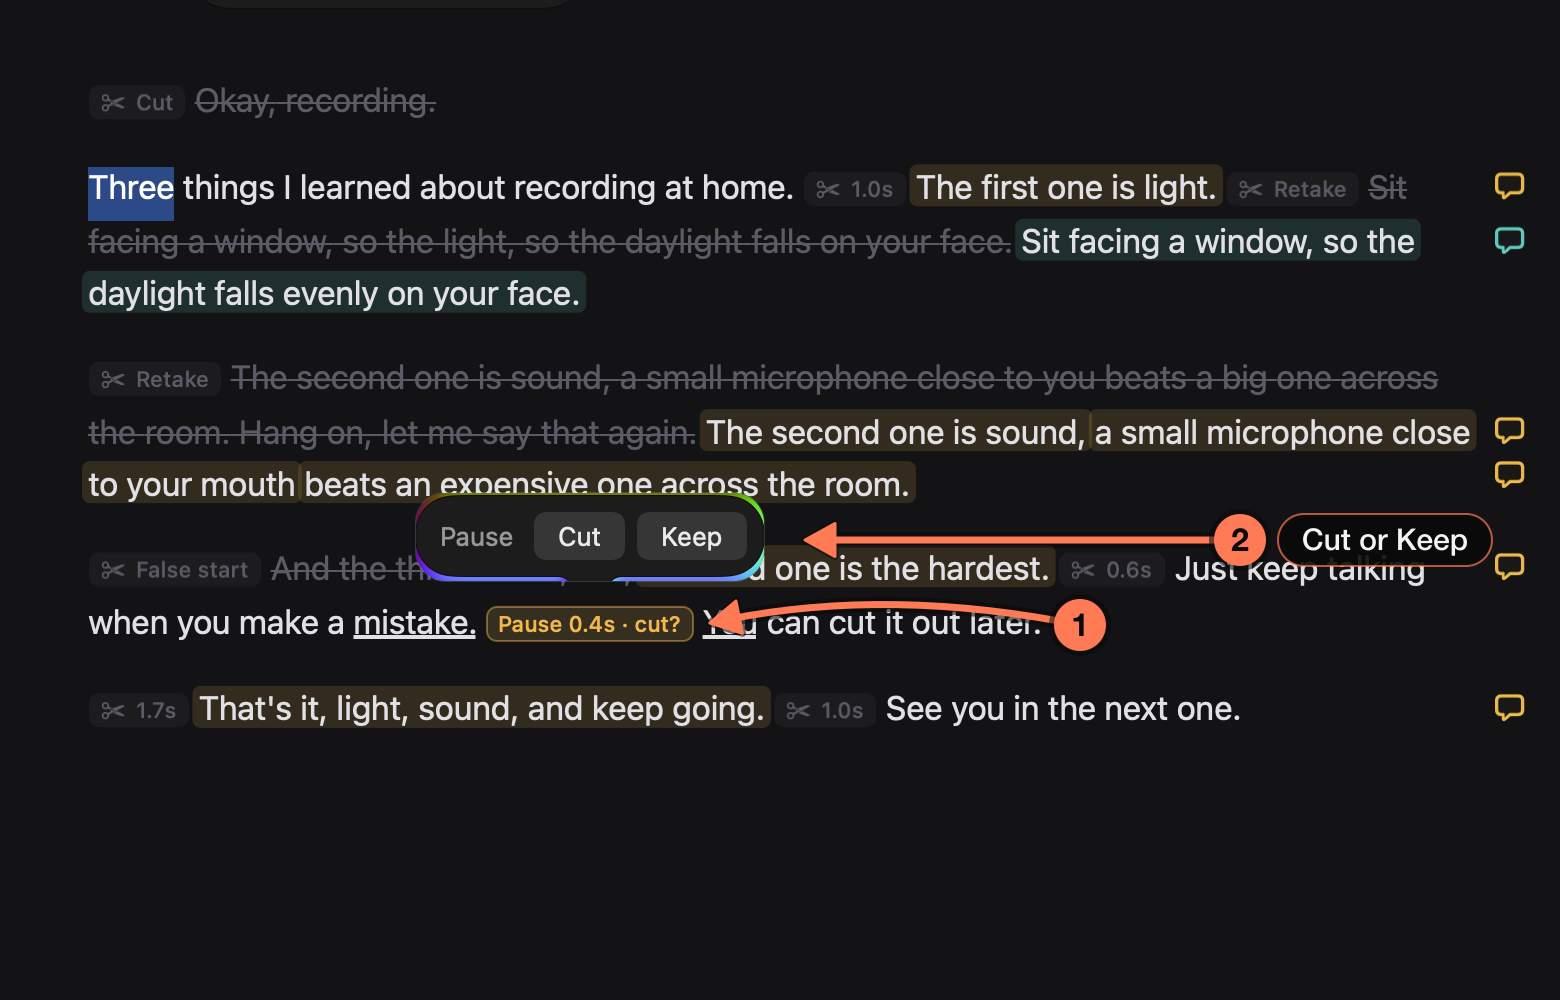
1. **A kept pause**, in the flag colour: the edge pass left this 0.4-second pause in and asks whether to cut it.
2. **Cut or Keep** answers it.
The chip also opens the pause’s details: its length, who kept it, and its out and in times, with **Cut It**, **Accept** and **Play**.
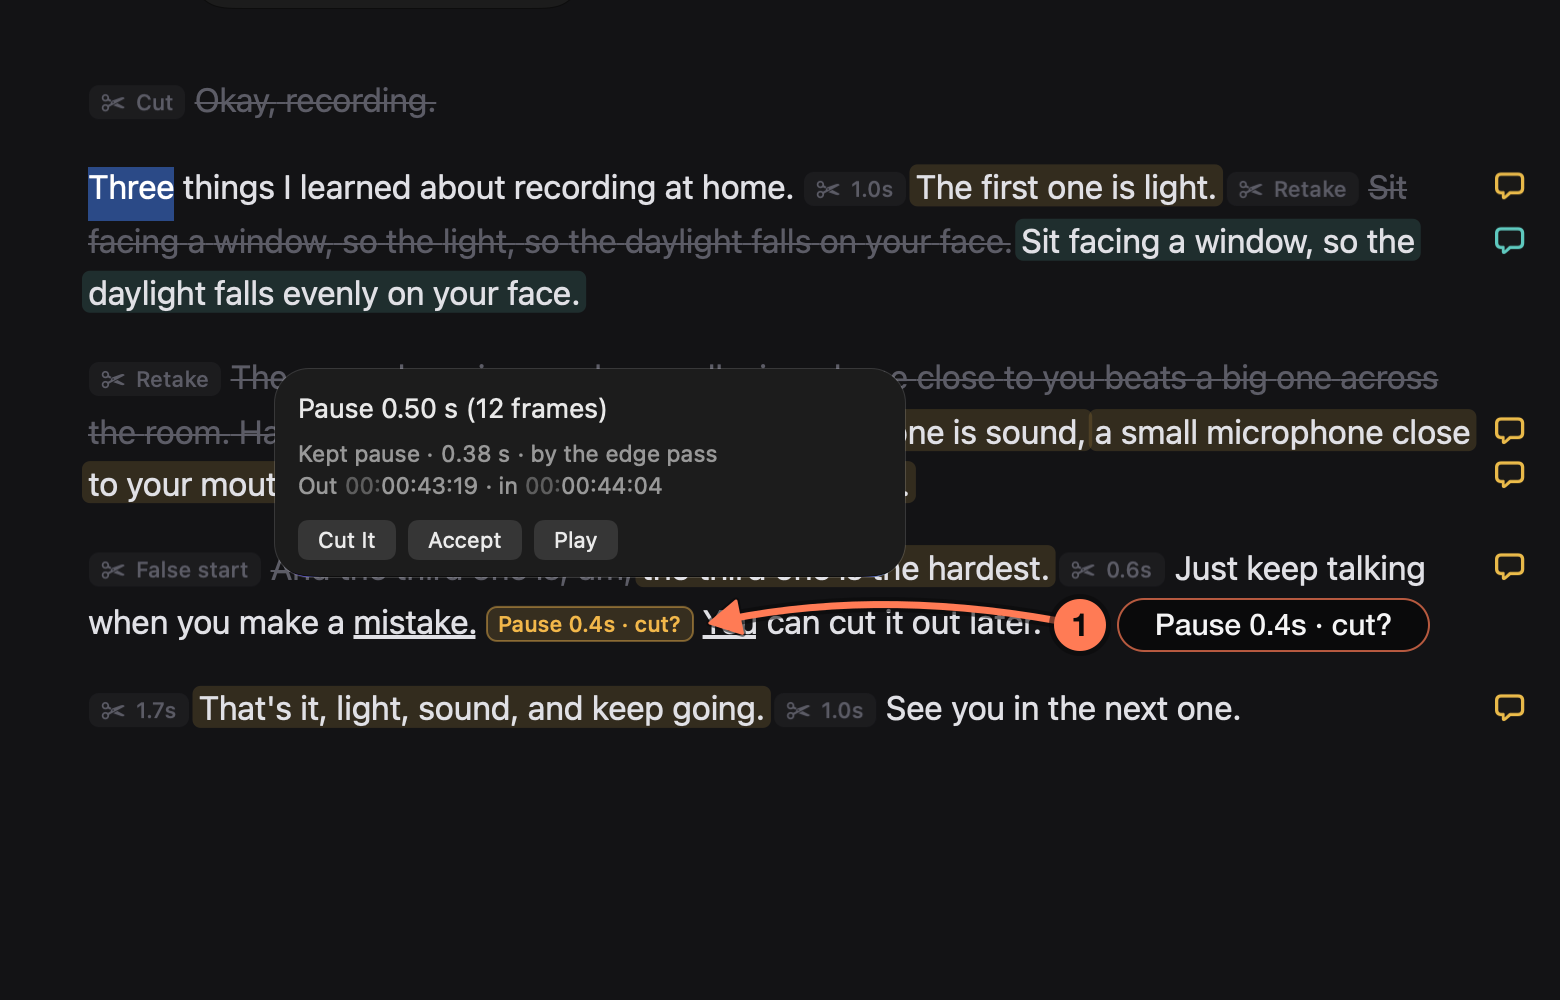
1. **The chip** you clicked. **Play** lets you hear the pause before you decide.
## Move a Cut Edge
Drag an edge handle on the timeline to move it. Double-click a handle to put it back on the waveform. For frame-accurate work on every join in turn, use [join review](https://sashimii.app/docs/reviewing-joins/).
## Place the Edges Again
**Cut › Place Edges on Waveform** (⇧ ⌘ E) runs the edge pass again over the whole cut, the same pass your agent runs at the end of a draft. It moves each edge onto the audio, cuts pauses between kept words, and flags borderline pauses for you.
## Related
- [Finding Your Way Around](https://sashimii.app/docs/the-window/)
- [Reviewing Joins](https://sashimii.app/docs/reviewing-joins/)
---
# Reviewing Joins (Sashimii Docs, Editing)
> Step through every join in the cut at frame zoom, listen across it, fix its edges and accept it.
Canonical: https://sashimii.app/docs/reviewing-joins/
Last updated: 2026-11-02
A join is where two kept clips meet. Join review steps through every join in order, so you can hear each one and fix it before you export. Press R or ⌘ J, or click **Review** in the toolbar. While it runs, the toolbar shows how far through you are, such as **Reviewing 3/9**.
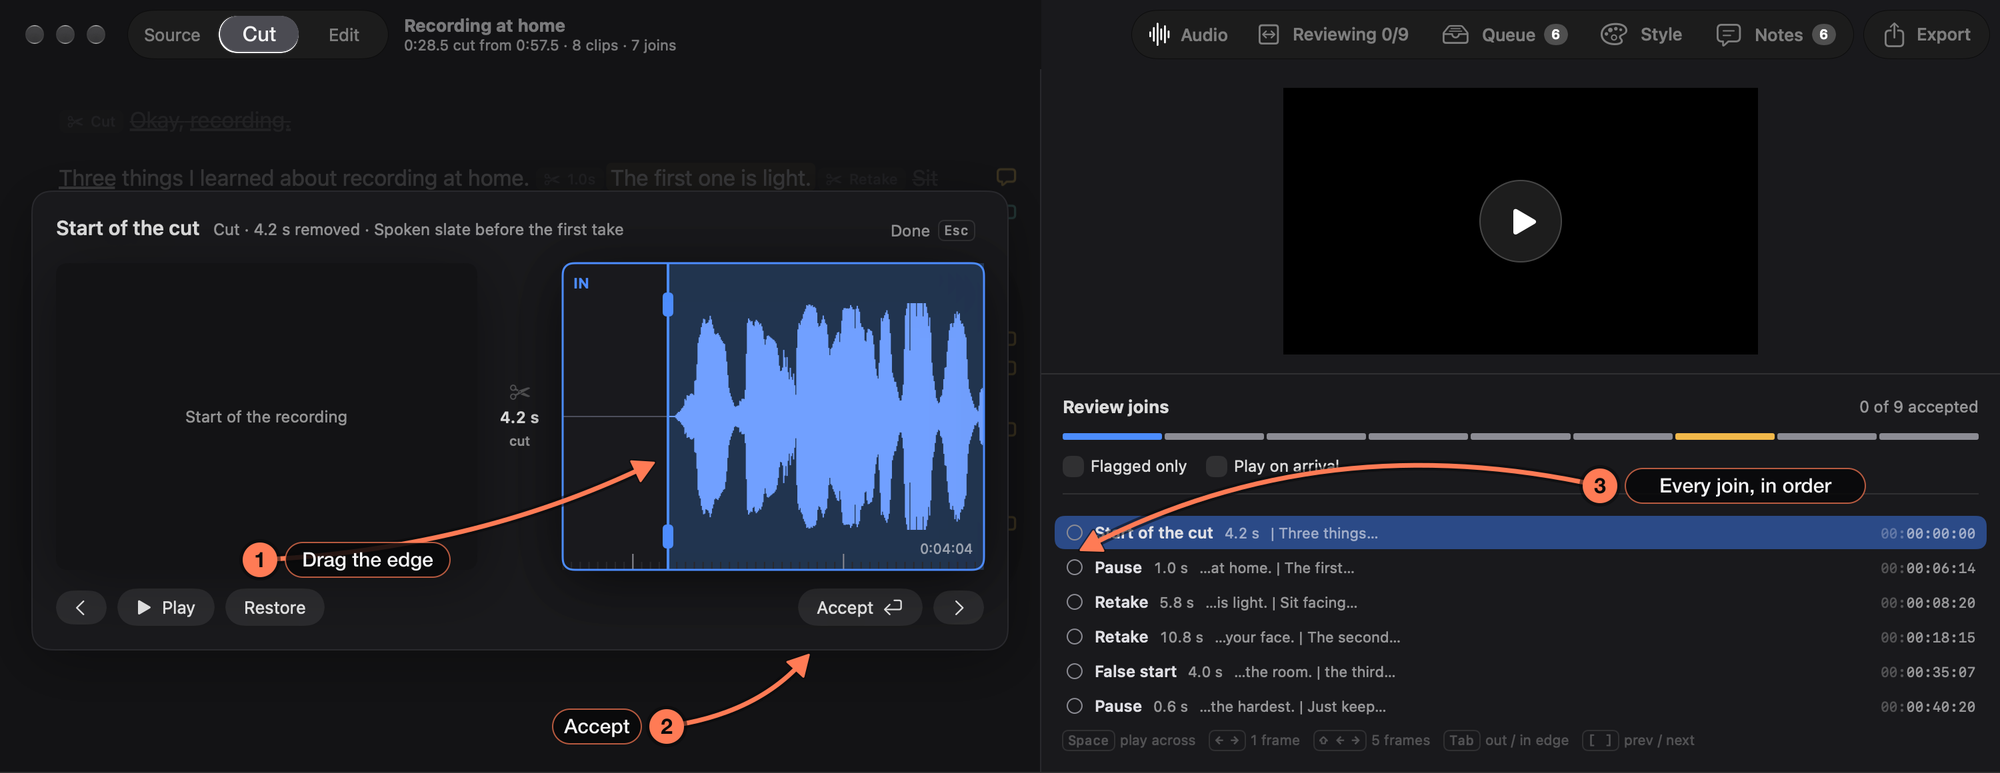
1. **The join at frame zoom.** The out side (the end of the clip before the join) and the in side (the start of the clip after it), side by side. The line on each waveform is its edge.
2. **Accept** marks the join as right and moves to the next one.
3. **Every join, in order**, with what was cut there (Retake, Pause, False start) and how long. The count at the top shows how many you have accepted.
## Fix a Join
- **Drag a side’s waveform** to slide the clip. The waveform follows the pointer, so dragging right moves the edge earlier.
- **Drag the edge line** itself.
- **Nudge** the active edge with ← →: one frame, or five with Shift. Tab switches between the out and in side.
The join replays after each change. **Restore** brings back what was cut there.
## Keys
| Key | What it does |
| --- | --- |
| Space | Play across the join |
| ← → | Nudge the active edge a frame (Shift: five) |
| Tab | Switch between the out and in side |
| Return | Accept and move to the next join |
| [ ] | Previous and next join |
| Esc | End review |
**Flagged only** limits the list to joins the edge pass flagged for you. **Play on arrival** plays each join as you reach it.
## Kept Pauses in Review
A pause the edge pass left for you shows whole, between its out and in lines. Move either line to set how much **Cut this pause** would remove; the replay and Space then play that trim without making it. **Accept** keeps the whole pause.
## From Edit View
In Edit view, every cut has a mark on the timeline. Click one (or step with [ and ]) to select its join: **Play** plays a second across it, and **Open in Cut** (or Return) opens join review on it. You can also drag the handles either side of the mark to move that clip’s edge. See [Edit View and Graphics](https://sashimii.app/docs/edit-view-and-graphics/).
## Related
- [Cutting and Restoring Words](https://sashimii.app/docs/cutting/)
- [Notes and Directions](https://sashimii.app/docs/notes/)
---
# Notes and Directions (Sashimii Docs, Editing)
> Leave notes on words or ranges, tag them with what should happen there, and hand them to your agent through the agent queue.
Canonical: https://sashimii.app/docs/notes/
Last updated: 2026-11-02
A note marks a stretch of the recording and says something about it: a reminder for yourself, a question about a cut, or a direction for your agent, like “put these three words on screen”.
## Add a Note
Select words in the transcript (or a range on the timeline) and press N, or choose **Add Note…** in the popover above the selection.
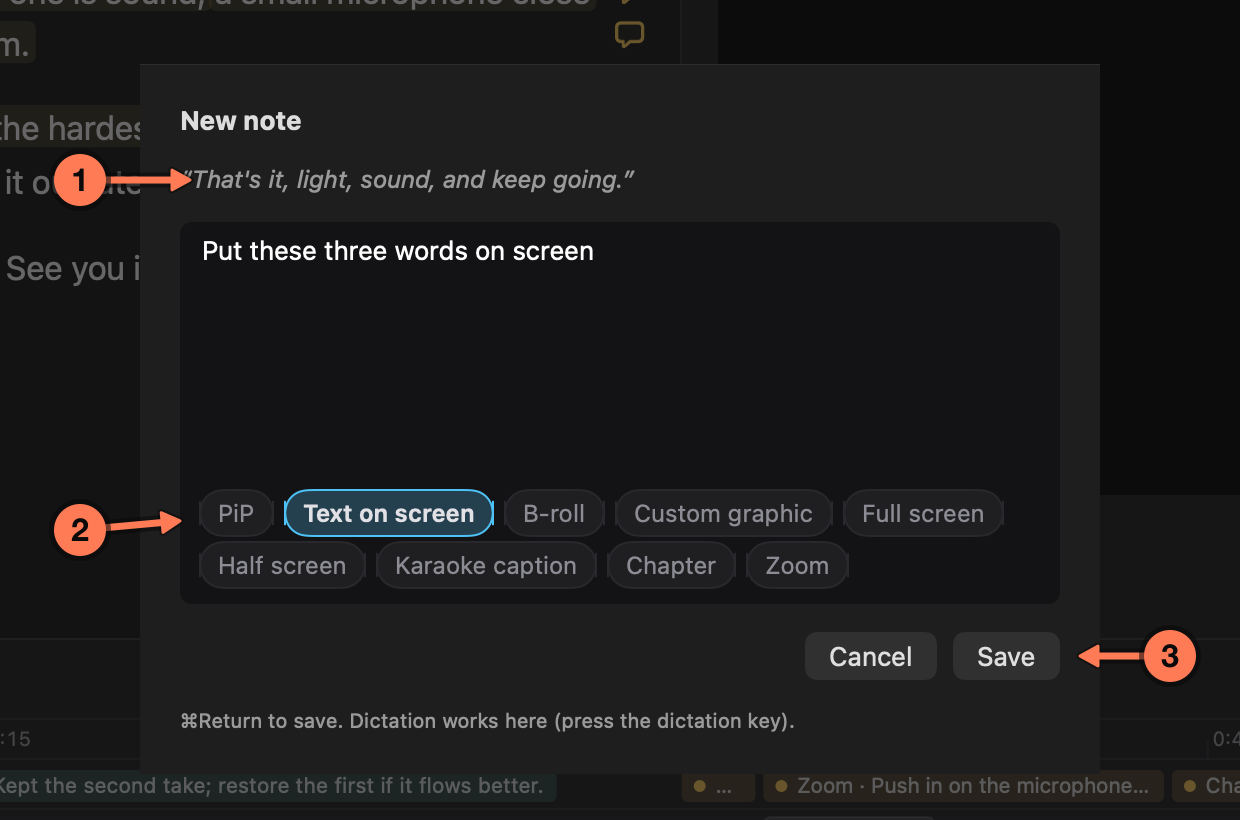
1. **The words the note is on.** Type the note in the box below them; dictation works there too.
2. **Tags** say what the note asks for. Pick as many as apply, or none for a plain note.
3. **Save** (⌘ Return).
| Tag | Asks for |
| --- | --- |
| PiP | The video small, in a corner, over something else |
| Text on screen | Words on screen |
| B-roll | Other footage over this part |
| Custom graphic | A graphic you describe |
| Full screen | A graphic that fills the frame |
| Half screen | A graphic beside you, taking half the frame |
| Karaoke caption | Captions that follow the words as they are said |
| Chapter | A YouTube chapter starting here; the note’s first line is its title. See [YouTube Chapters](https://sashimii.app/docs/chapters/). |
| Zoom | A push in on the video |
Tags describe the request; whoever answers the note, usually your agent, chooses how to make it.
## Who Wrote It
Colour shows the author: **gold** for your notes, **teal** for your agent’s. The same colour is on the tint over the note’s words, its bubble in the transcript’s margin, its pin on the timeline and its row in the Notes column. Editing a note keeps its author.
## The Notes Column
Click **Notes** in the toolbar, or choose **View › Notes** (⌃ ⌘ I).
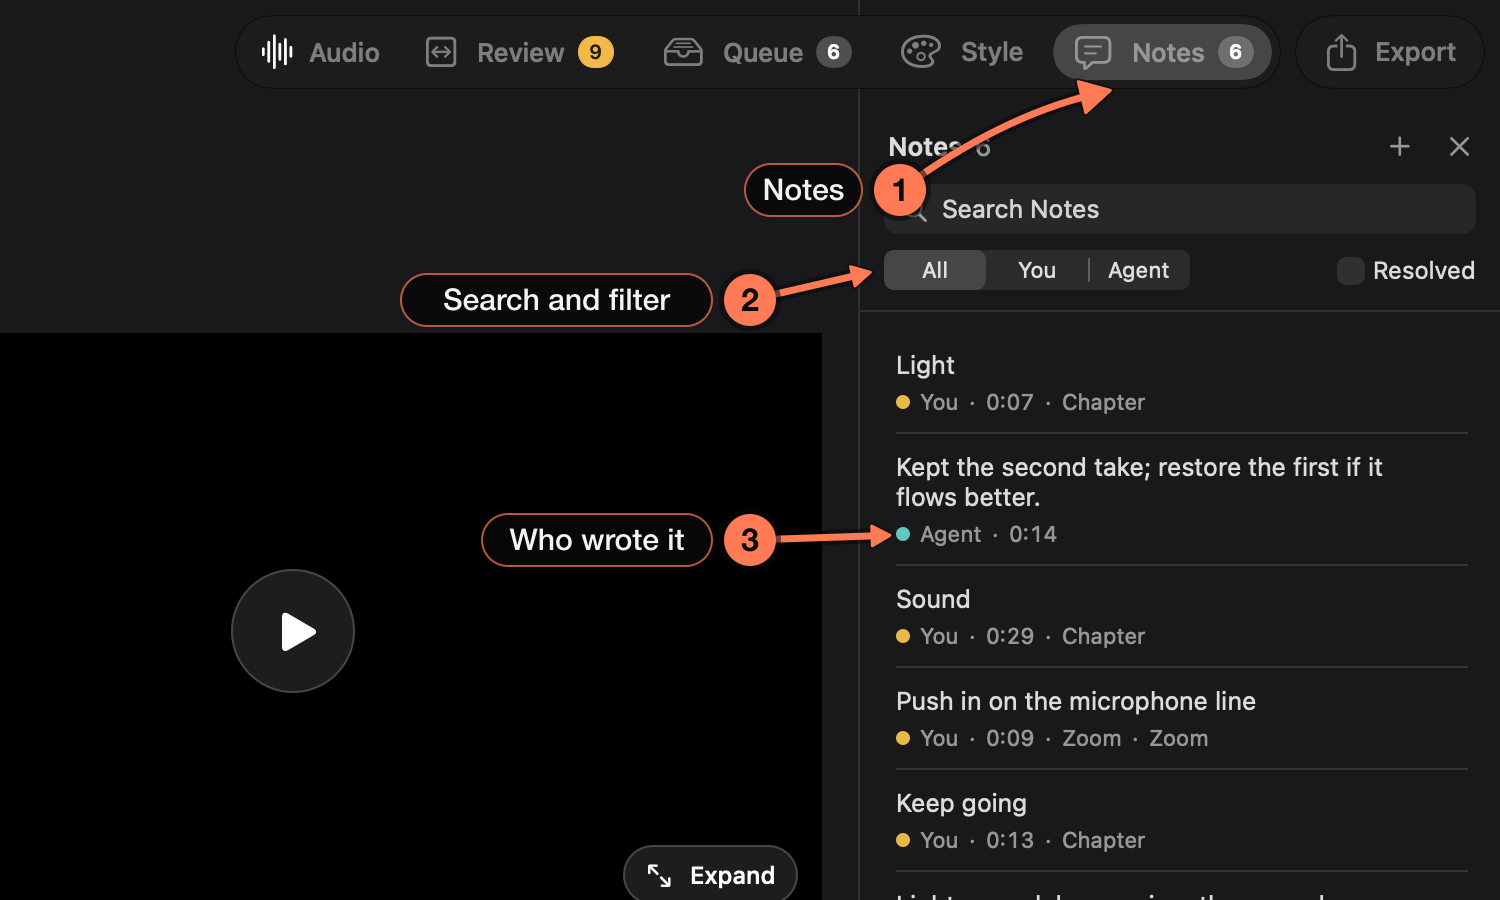
1. **Notes** shows and hides the column.
2. **Search and filter.** Search the text, show All, only You or only Agent, and tick **Resolved** to include notes that have been dealt with.
3. **Each note** with who wrote it, its time and its tag. Choose a row to jump to the note; double-click it to edit.
## Hand Notes to Your Agent
**Queue** in the toolbar lists everything waiting for your agent: open notes, and graphics waiting for a retime.
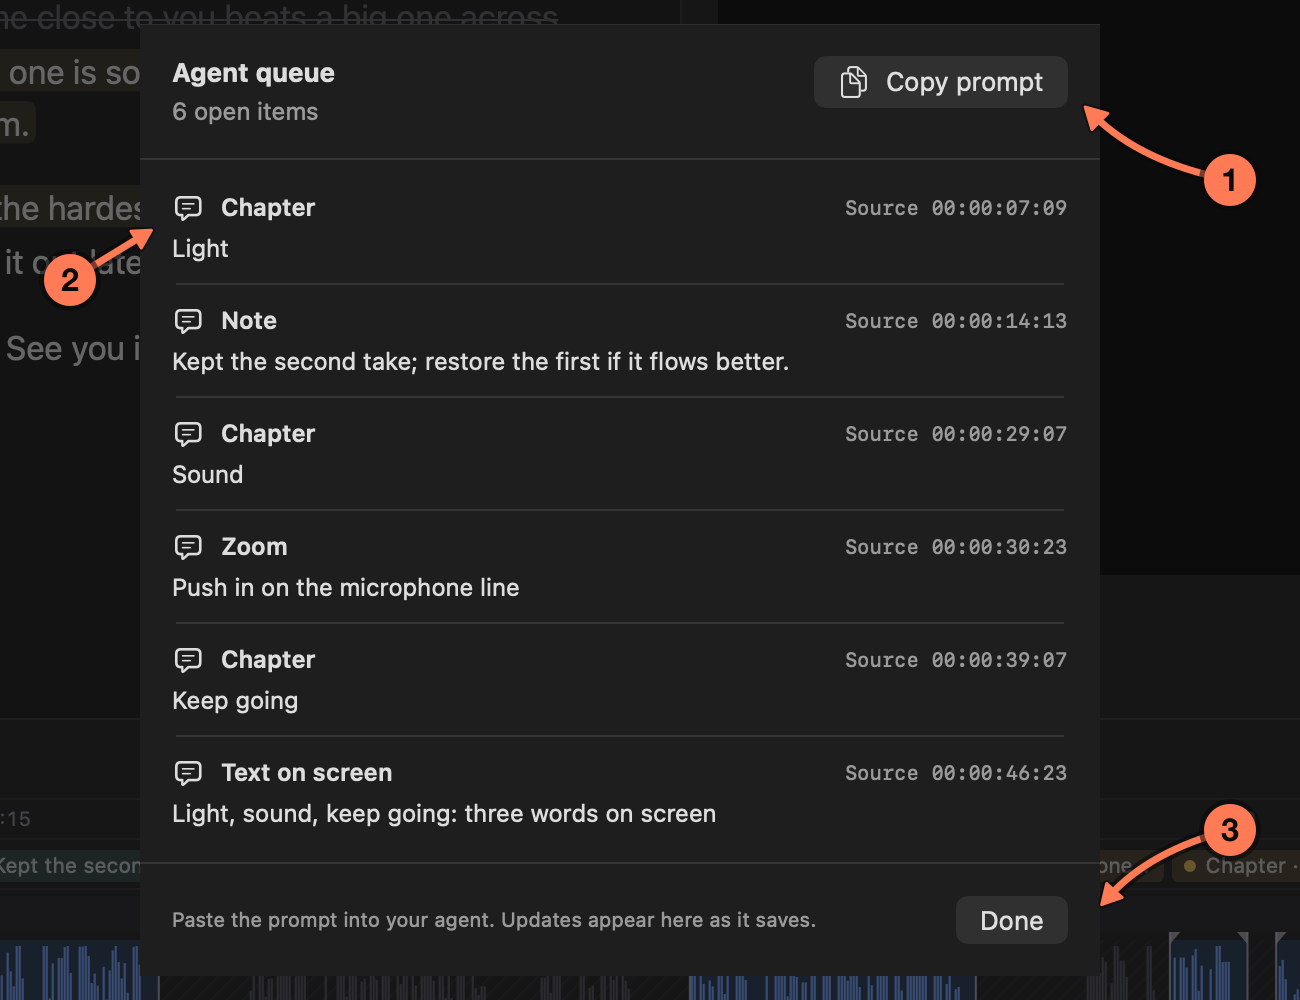
1. **Copy prompt** copies the open items, with instructions, to paste into your agent. Or just tell your agent `check Sashimii`: your open notes show up there too.
2. **The open items**, with their time in the recording. Click one to show it on the timeline.
3. **Done** closes the queue. It updates while you work.
When your agent has handled a note, the note leaves the transcript and the timeline. To send it back, right-click it in the Notes column and choose **Reopen**.
## Related
- [Reviewing Joins](https://sashimii.app/docs/reviewing-joins/)
- [Edit View and Graphics](https://sashimii.app/docs/edit-view-and-graphics/)
---
# Edit View and Graphics (Sashimii Docs, Editing)
> Watch the cut as one continuous timeline, adjust joins from it, and move, retime, approve or send back the graphics your agent made.
Canonical: https://sashimii.app/docs/edit-view-and-graphics/
Last updated: 2026-11-02
Edit view (⌘ 3, or E from Cut) shows the cut as it will play: one continuous timeline of the kept parts, with their graphics.
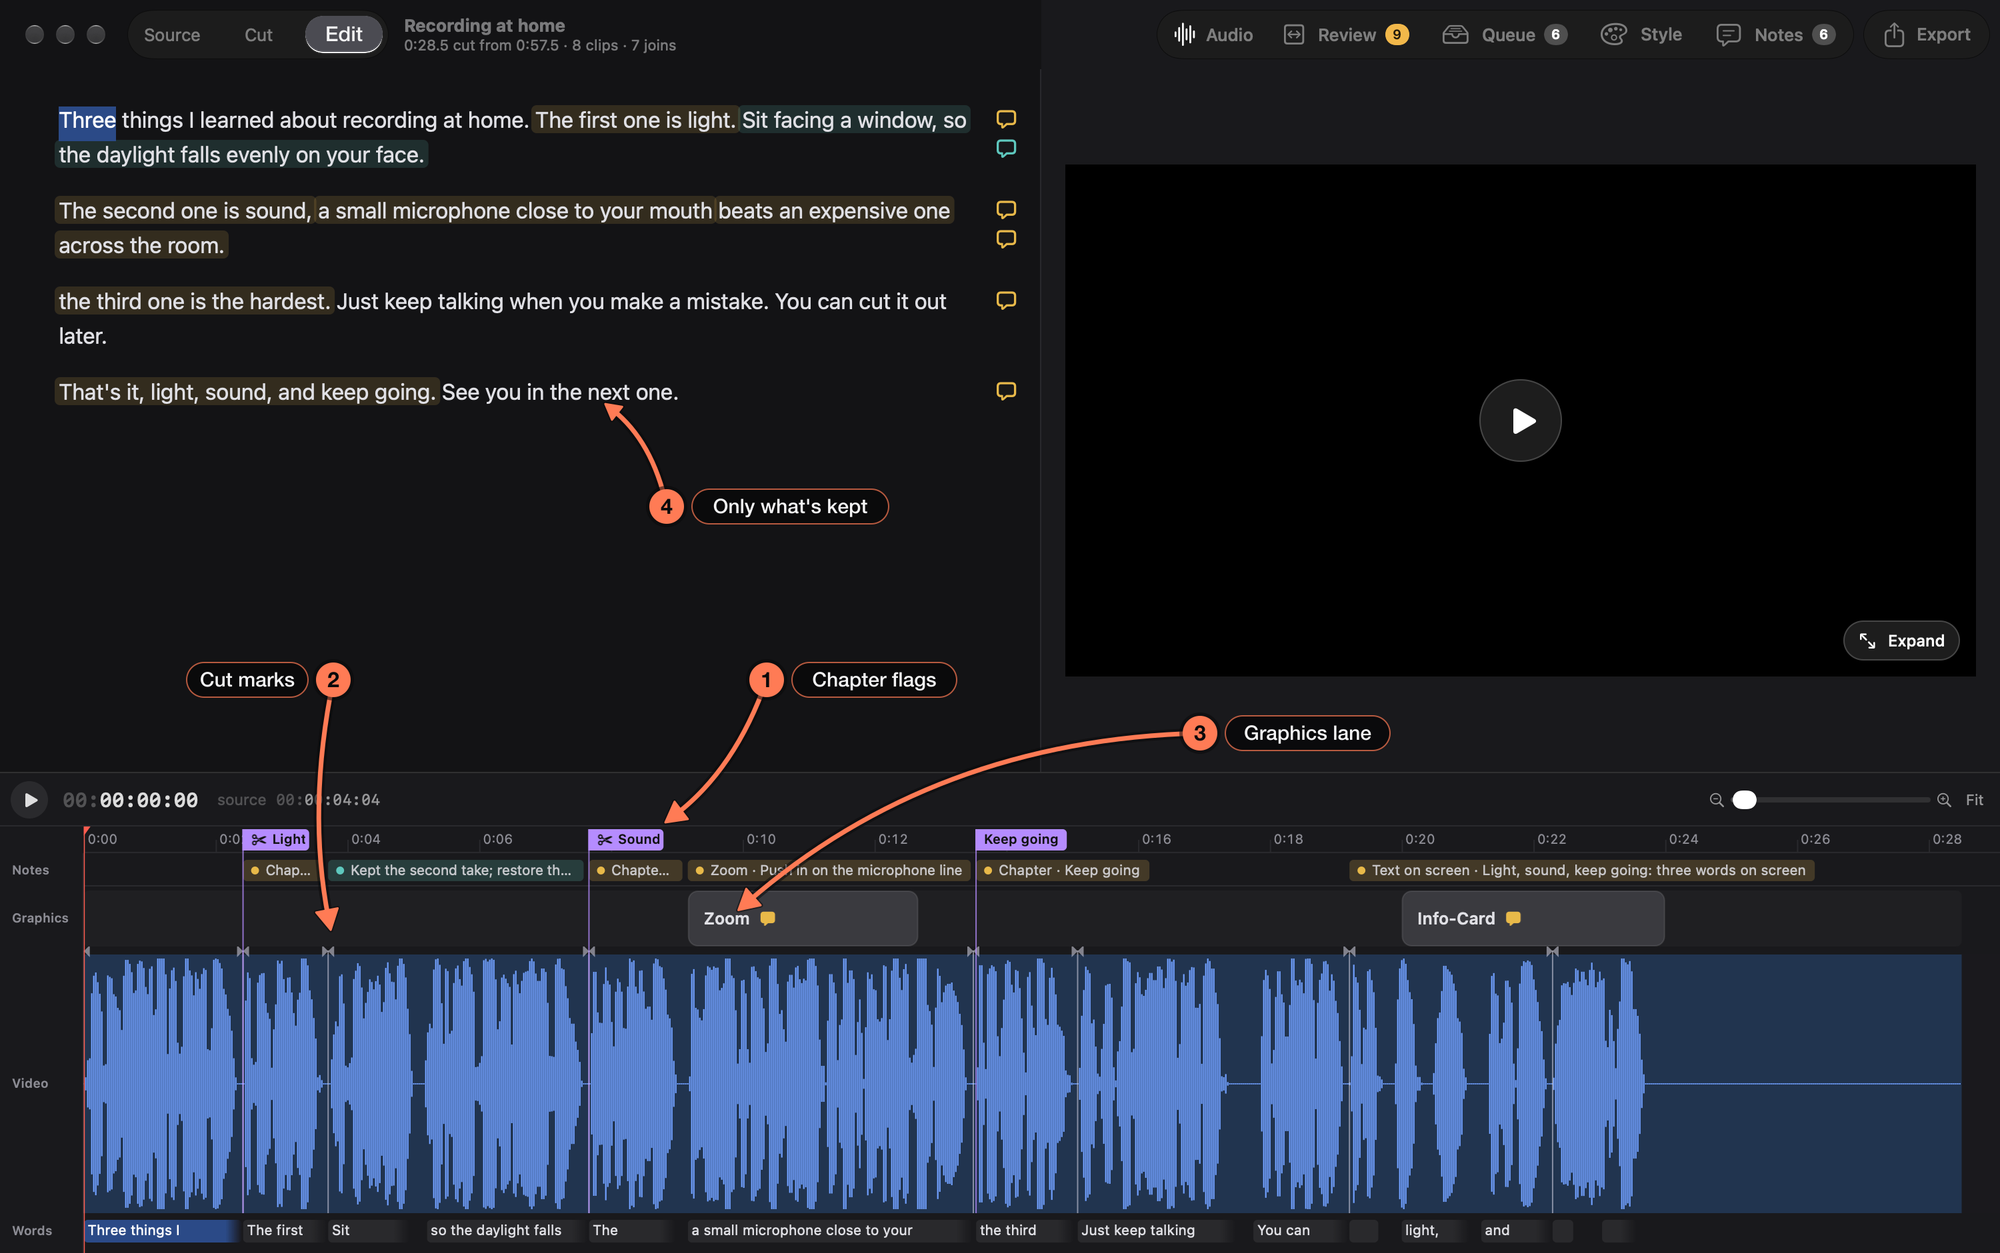
1. **Chapter flags**, in purple on the ruler, at each chapter’s place in the cut.
2. **Cut marks**: one at every join, green once it is accepted and amber when it is flagged.
3. **The graphics lane**, above the waveform. Here it holds two graphics the agent made from notes: a Zoom and an Info-Card, each with a speech bubble for its note.
4. **The transcript** shows only what’s kept.
## Adjust a Join
Click a cut mark (or step to one with [ and ]). The playhead jumps there, the mark turns blue with a handle on each clip edge, and a popover offers:
- **Play**: one second of the cut across the join.
- **Open in Cut** (Return): switches to Cut with [join review](https://sashimii.app/docs/reviewing-joins/) open on that join.
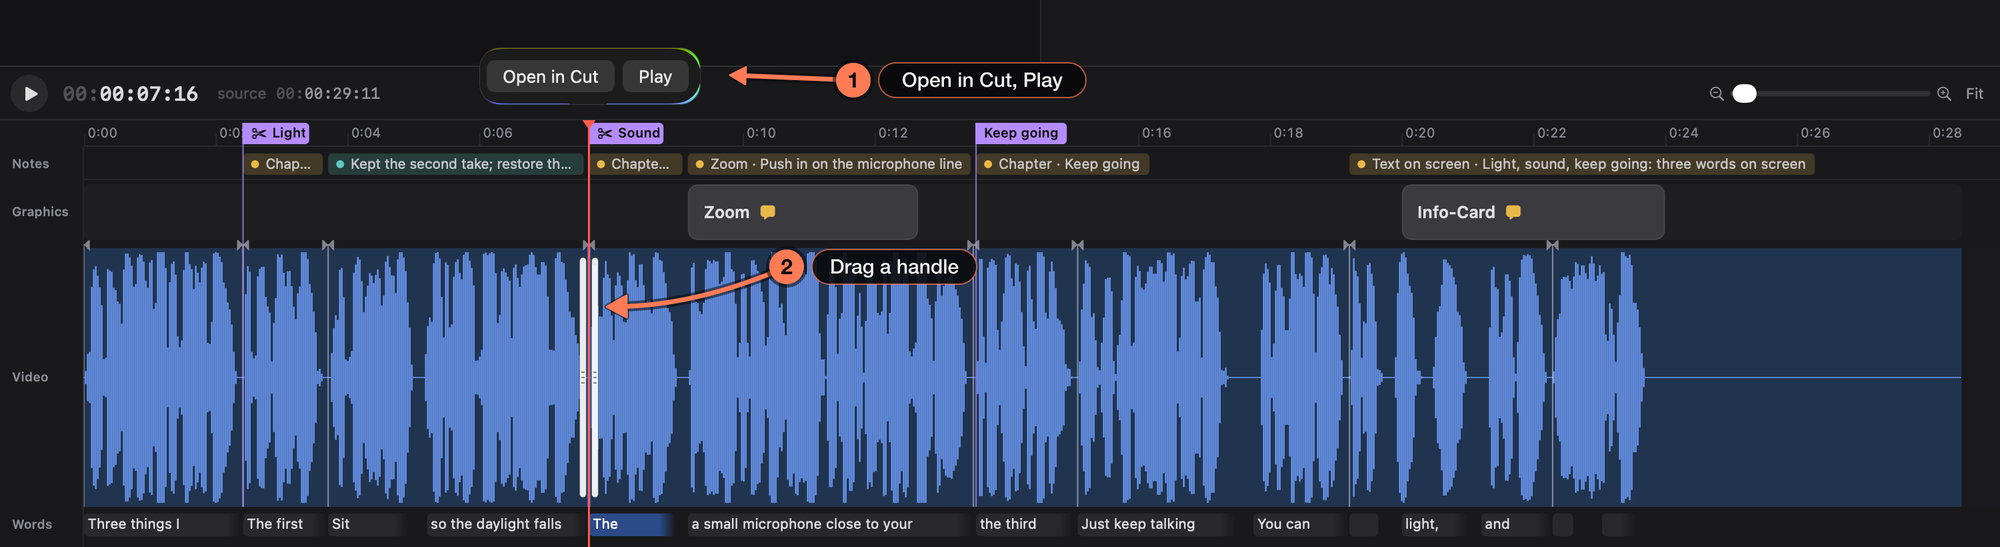
1. **Open in Cut** and **Play**, for the selected join.
2. **The handles** on each side of the join.
Drag a handle to move that edge. The left handle is the end of the clip before the join; the right one is the start of the clip after it. Dragging away from the join brings more of that clip back; dragging toward it tucks it under. While you drag, the video shows the frame at the edge. Right-click a mark for **Open in Cut**, **Play Join** and **Accept**.
## Graphics
Graphics are made by your agent, usually in answer to a tagged note, and follow the project’s [Style](https://sashimii.app/docs/styles/). Each one is a bar on the graphics lane, showing its name and a speech bubble for each open note on it. Hovering a bar lights its words in the transcript; clicking it selects it and opens its popover.
| To | Do this |
| --- | --- |
| Move a graphic | Drag the bar’s body |
| Change its length | Drag its end. A caption timed from its words stays on its words: drag its start to change how early it appears, and its end to change how long it holds. |
| Approve it | Select it and press A (again to unapprove) |
| Delete it | Select it and press Delete |
| Ask for a change | Select it and press N, or type in **Ask for a change…** in its popover |
A note on a graphic follows the graphic’s timing, and the agent queue names the graphic, so your agent knows which one to fix. Some graphics can’t simply be stretched; when you change their length they are marked as waiting for your agent to retime them, with a clock on the bar. A broken graphic is hatched red, and its tooltip says what is wrong.
Every change saves within half a second, keeps your agent’s edits, and undoes with ⌘ Z.
## Related
- [Notes and Directions](https://sashimii.app/docs/notes/)
- [Voice Cleanup](https://sashimii.app/docs/voice-cleanup/)
---
# Voice Cleanup (Sashimii Docs, Editing)
> Clean up background noise and room echo in your voice, preview the result against the original, and choose how much to apply.
Canonical: https://sashimii.app/docs/voice-cleanup/
Last updated: 2026-11-02
Voice cleanup reduces background noise and room echo in the recording, on your Mac. It is on for new projects, at Amount 75%, unless you untick **Clean up voice** at setup. The transcript and the waveform always use the original sound.
Open it with **Audio** in the toolbar, or **Cut › Voice Cleanup…** (⌥ ⌘ V). The Audio icon shows whether cleanup is on.
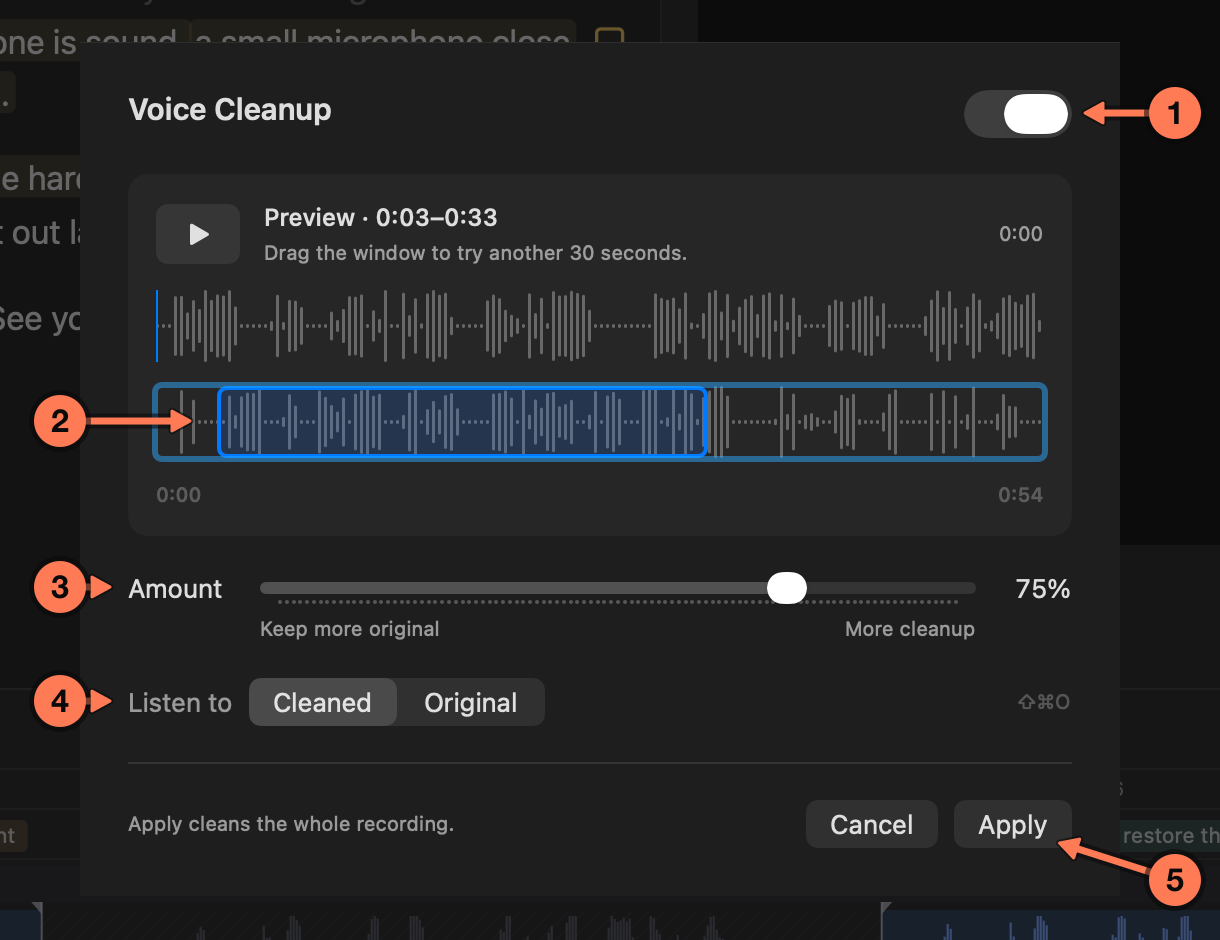
1. **On or off** for the whole project.
2. **The preview window**: 30 seconds of speech. Drag it along the recording to try another passage.
3. **Amount**: lower keeps more of the original sound, higher cleans more.
4. **Listen to** Cleaned or Original, to compare (⇧ ⌘ O).
5. **Apply** cleans the whole recording at that Amount.
Outside the sheet, **Cut › Listen to Original** (⇧ ⌘ O) flips the main preview between the cleaned and the original sound.
A rendered video uses the cleaned voice when cleanup is on. An export to DaVinci Resolve always uses the original recording, so you can do your own sound work there.
## Related
- [Edit View and Graphics](https://sashimii.app/docs/edit-view-and-graphics/)
- [Exporting](https://sashimii.app/docs/exporting/)
---
# Exporting (Sashimii Docs, Finishing)
> Render the cut as an MP4, export it to DaVinci Resolve as an editable timeline on your original footage, or write an audio project's cut as a WAV.
Canonical: https://sashimii.app/docs/exporting/
Last updated: 2026-11-02
Click **Export** in the toolbar, or choose **Cut › Export…** (⌘ E). The Export sheet asks what to make first; **Next…** then asks where to save it.
## A Video File
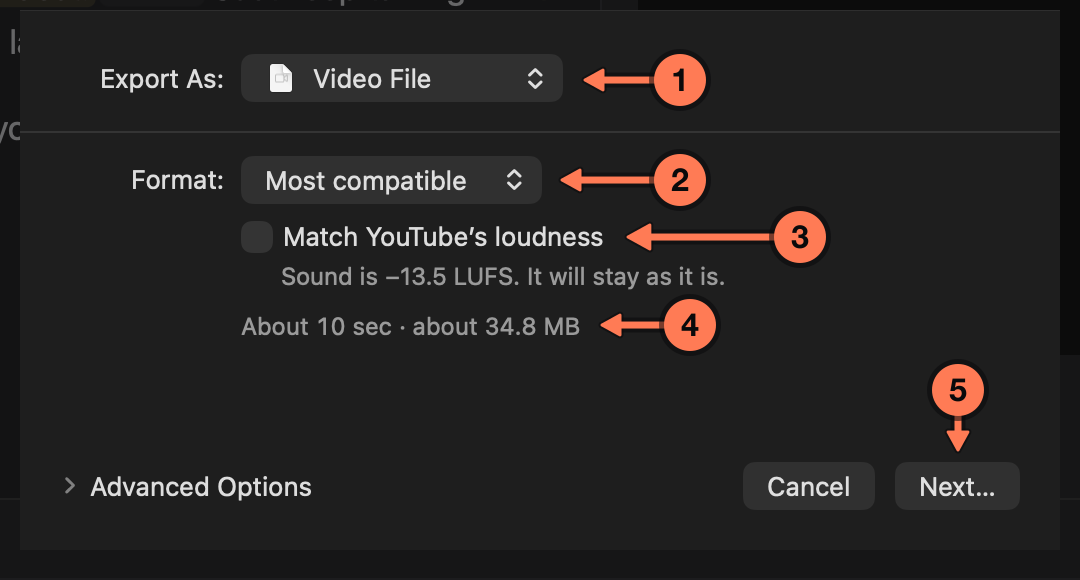
1. **Export As** picks what to make: a video file, or DaVinci Resolve.
2. **Format**, for a video file.
3. **Match YouTube’s loudness**, with the cut’s measured loudness under it.
4. **An estimate** of how long the render takes and how big the file will be.
5. **Next…** opens the save panel, to name the file and choose where it goes.
**Export As: Video File** renders an MP4 of the cut with its graphics, from your original recording, with the cleaned voice when voice cleanup is on.
- **Format:** **Best for YouTube** (HEVC 10-bit) or **Most compatible** (H.264).
- **Match YouTube’s loudness** brings the sound to −14 LUFS.
The sheet lists anything it can’t do, such as a graphic it can’t draw or a separate recording that’s missing, and won’t start when the recording is missing or the disk you chose is short of space.
Progress shows on the Export button. Click it for **Stop**, and when the movie is done, **Show in Finder** and **Copy YouTube Chapters**. You can keep editing while it renders; the render doesn’t change.
## DaVinci Resolve
**Export As: DaVinci Resolve** writes an editable rough cut instead of a finished movie: a `.fcpxmld` bundle (FCPXML 1.13) built from your original media. Each kept section is its own clip on your original footage, so you can ripple, add B-roll and grade as if you had cut it in Resolve.
- **Sound:** the recording you chose at setup, original rather than cleaned, at its own channels and sample rate. When a separate recording needs it, the bundle carries a lined-up copy of it.
- **Timecode:** your source timecode is kept. At 29.97 fps you can choose drop-frame or non-drop-frame.
- **Frame rates:** 23.976, 24, 25, 29.97, 30, 50, 59.94 and 60 fps. Variable frame rate footage needs converting first.
- **Joins** are hard cuts, for you to finish in Resolve.
- **The export report** (`export-report.json`, in the bundle) lists every section, note, chapter and graphic. **View Export Report** opens it when the export finishes. Notes, chapters and graphics come across as reminders, not finished graphics; Resolve doesn’t read the markers from the bundle yet, so the report is where to find them.
Your originals stay where they are. The Resolve export is tested with DaVinci Resolve 21.1.1, and Resolve is the only editor Sashimii exports to.
## An Audio Project’s WAV
In an audio project, **Export…** writes the cut as a 24-bit WAV with a 10 ms crossfade at every join: the cleaned voice in mono at 48 kHz when voice cleanup is on, otherwise the recording at its own sample rate and channels. See [Audio Projects and Voiceover Videos](https://sashimii.app/docs/audio-and-voiceover/).
## When Something Goes Wrong
One export runs at a time; ⌘ E during one shows its progress. A failed export says why on the Export button, with **Try Again** and **Choose Another File…**.
## Related
- [Voice Cleanup](https://sashimii.app/docs/voice-cleanup/)
- [YouTube Chapters](https://sashimii.app/docs/chapters/)
---
# YouTube Chapters (Sashimii Docs, Finishing)
> Mark chapters while you review by tagging notes, see them in Edit view, and copy the chapter list for your YouTube description.
Canonical: https://sashimii.app/docs/chapters/
Last updated: 2026-11-02
Chapters come from notes. Tag a note **Chapter** and it marks a chapter at the note’s start; the note’s first line is the chapter’s title. Do it as you review, while you are listening anyway. See [Notes and Directions](https://sashimii.app/docs/notes/).
## See Them
Edit view shows each chapter as a purple flag on the ruler, at its time in the cut. A chapter whose start was cut sits at the next kept frame, marked with scissors.
## Copy Them
**Cut › Copy YouTube Chapters** copies one line per chapter, `m:ss Title`, ready for your video’s description. For example:
```
0:00 Intro
0:42 Light
1:30 Sound
2:15 Keep going
```
When no chapter starts at 0:00, the list starts with `0:00 Intro`, as YouTube needs. If YouTube wouldn’t show the list (fewer than three chapters, or one shorter than 10 seconds), an alert says why; the list is copied anyway.
After a render, **Copy YouTube Chapters** in the Export popover copies the times from the finished movie.
## Related
- [Exporting](https://sashimii.app/docs/exporting/)
- [Styles](https://sashimii.app/docs/styles/)
---
# Styles (Sashimii Docs, Finishing)
> Make a visual Style for your graphics by picking from options your agent shows over your own footage, then use it in every project.
Canonical: https://sashimii.app/docs/styles/
Last updated: 2026-11-02
A Style is the look your graphics follow: type, palette, texture, how things move, and rules such as “never cover the face”. Your agent designs every graphic in a project to match the project’s Style, while still making whatever the video needs. Styles are saved in `~/Documents/Sashimii/Styles` and are there for every project.
## Choose a Style for a Project
At setup, the **Style** pop-up on the New Project screen lists your saved Styles and drafts, with your last choice first. **No Style** is fine when you don’t want graphics. Setup remembers your choice. See [Setting Up a Project](https://sashimii.app/docs/projects/).
## The Style Board
Click **Style** in a video project’s toolbar, or choose **File › Style Board…** (⌥ ⌘ S). It shows the project’s Style: its sample reel, type, palette, texture, feel and rules. Its footer holds every Style action: **Edit This Style…**, **Start a New Style on This Video…** and **Continue Draft**.
## Make a New Style
Choose **File › Start a New Style on This Video…** (⌥ ⌘ N), or use the button on the Style board, and name it. The Style studio opens on a new Style that uses this project’s video for its examples. No existing Style is changed.
1. **Write a brief**: your words, files, links and hard rules. Press **Start** (⌘ Return), then tell your agent `check Sashimii`. **Copy Prompt** is there too. The studio moves on by itself when your agent connects.
2. **Pick the kinds of graphics you’d like**, if any, while your agent works: lower thirds, chapter titles, captions, charts and so on. Picks guide your agent; they never limit it.
3. **Pick one of four Styles**, each shown playing over your own video. Click one or press A–D, add a note if you like, and **Send Pick** (⌘ Return).
4. **Answer your agent’s questions** and **Send Answers**. While it works, the studio shows its latest line and the time so far.
5. **Approve the sample reel**: a short reel of the Style on your footage. **Use this Style** saves it. Type what should change instead, and the button becomes **Send to Agent**, for another take.
**Close** (Esc) asks whether to keep or discard the draft. **Resume** continues a stopped draft where it left off.
## Related
- [YouTube Chapters](https://sashimii.app/docs/chapters/)
- [Audio Projects and Voiceover Videos](https://sashimii.app/docs/audio-and-voiceover/)
---
# Audio Projects and Voiceover Videos (Sashimii Docs, Finishing)
> Cut a podcast, lesson or other audio-only recording, export it as a WAV, or turn it into a voiceover video with graphics.
Canonical: https://sashimii.app/docs/audio-and-voiceover/
Last updated: 2026-11-02
## Audio Projects
A folder that holds one audio file and no video makes an audio project. Supported files are WAV, AIFF, M4A, MP3, CAF and FLAC; with several in the folder, Sashimii asks which.
Setup runs the same steps as for a video, without the sync. The window has the transcript, the waveform timeline, join review and playback of the cut, but no video, Edit view or graphics. Your agent drafts it the same way: `check Sashimii`.
**Export…** (⌘ E) writes the cut as a 24-bit WAV with a 10 ms crossfade at every join: the cleaned voice in mono at 48 kHz when voice cleanup is on, otherwise the recording at its own sample rate and channels.
## Voiceover Videos
An audio project can become a voiceover project for an explainer video. Choose **View › Visuals**, pick the Style its graphics should follow (or No Style), and click **Turn On**.
The picture shows a black canvas, and the window gains the Edit view, the graphics lane, chapter flags and **Copy YouTube Chapters**, as a video project has. Graphics play over the black picture as they would over video. The PiP, Half screen and Zoom tags are left out, since there is no video to move.
Export still writes the WAV; rendering a voiceover video to a movie isn’t there yet. Choose **View › Visuals** again to switch back to a plain audio project. Notes, graphics and the Style stay, and ⌘ Z undoes either switch.
## Related
- [Styles](https://sashimii.app/docs/styles/)
- [Keyboard Shortcuts](https://sashimii.app/docs/keyboard-shortcuts/)
---
# Keyboard Shortcuts (Sashimii Docs, Reference)
> The keyboard shortcuts in Sashimii, for playback, cutting, join review, notes, graphics and export.
Canonical: https://sashimii.app/docs/keyboard-shortcuts/
Last updated: 2026-11-02
## Views and Playback
| Keys | What they do |
| --- | --- |
| ⌘1 | Source view: the whole recording |
| ⌘2 | Cut view: playback skips the cuts |
| ⌘3 | Edit view: the cut with its graphics |
| E | Switch between Cut and Edit |
| Space | Play or pause |
| J | Jump back 3 seconds and play |
| K | Pause |
| L | Play; press again while playing to speed up, up to 2× |
| ← → | Step one frame |
| ⇧← ⇧→ | Step one second |
| Home, End | Jump to the start or end |
| ⌥F | Large Preview on or off |
| [ ] | Jump to the previous or next join |
| Esc | Close a popover, then clear the selection, then leave Large Preview |
## Timeline
| Keys | What they do |
| --- | --- |
| = and - | Zoom in and out around the playhead |
| ⌘-scroll, pinch | Zoom around the pointer |
| ⌘0 | Fit the whole recording |
| ⌥-drag | Pan |
## Cutting
| Keys | What they do |
| --- | --- |
| Delete | Cut the selected words or range; restore struck-through words |
| ⇧Delete | Restore the selection |
| Delete, ⇧Delete | With a kept pause’s Cut and Keep showing: Cut, or Keep |
| ⇧⌘E | Place edges on the waveform again |
| ⌘Z, ⇧⌘Z | Undo, redo |
## Join Review
| Keys | What they do |
| --- | --- |
| R or ⌘J | Start or end join review |
| Space | Play across the join |
| ← → | Nudge the active edge a frame |
| ⇧← ⇧→ | Nudge it five frames |
| Tab | Switch between the out and in side |
| Return | Accept and move to the next join |
| [ ] | Previous and next join |
| Esc | End review |
## Notes and Graphics
| Keys | What they do |
| --- | --- |
| N | Add a note to the selected words, range or graphic |
| ⌘Return | Save the note |
| ⌃⌘I | Show or hide the Notes column |
| A | Approve the selected graphic (again to unapprove) |
| Delete | Delete the selected graphic |
## Project and Export
| Keys | What they do |
| --- | --- |
| ⌘N | New project from a folder |
| ⌘O | Open a project |
| ⌘W | Close the project |
| ⌘E | Export |
| ⌥⌘V | Voice cleanup |
| ⇧⌘O | Listen to the original sound |
| ⌥⌘S | Style board |
| ⌥⌘N | Start a new Style on this video |
## Related
- [Audio Projects and Voiceover Videos](https://sashimii.app/docs/audio-and-voiceover/)
- [For Agents](https://sashimii.app/docs/for-agents/)
---
# For Agents (Sashimii Docs, Reference)
> What an AI agent needs to help someone with Sashimii, the skill, the sashimii command-line tool, the project files, and the rules for changing them.
Canonical: https://sashimii.app/docs/for-agents/
Last updated: 2026-11-02
This page is for AI agents (Claude Code, Codex and others) helping a person use Sashimii, and for people who want to know what their agent does. The full drafting instructions ship with the app as the Sashimii skill; this page is the overview.
## The Skill and the Tool
- **The skill** is installed at `~/.claude/skills/sashimii/` (Claude Code) and `~/.agents/skills/sashimii/` (Codex) by **Sashimii › Install Command-Line Tool and Agent Skill…** in the app. Its `SKILL.md` and `references/` are the authoritative instructions: read them before drafting.
- **The command-line tool** is `sashimii`, linked at `~/.local/bin/sashimii`. If the shell can’t find `sashimii`, use `~/.local/bin/sashimii`, then `/Applications/Sashimii.app/Contents/Resources/sashimii`. If none exists, ask the person to run the install from the app’s Sashimii menu.
- `sashimii help` lists every command and flag.
When the person says “check Sashimii”, run `sashimii check`. It prints one JSON object whose `items` are what is waiting, newest first. Each item has a `kind`: `draft` (set up, no cut yet), `queue` (the person’s open notes, or graphics waiting for a retime), `busy` (another agent is working on it) or `style` (a Style request in the studio). It also has a `name`, `path`, `detail` and a `next` object (`action`, `message`, and `command` when there is one): do what `next` says. With nothing waiting, `next` says what to tell the person.
## Commands
| Command | What it does |
| --- | --- |
| `sashimii check [ …]` | What is waiting for an agent, as JSON. Writes nothing. |
| `sashimii info ` | Summary of the project and its cut. Fails if a project file doesn’t parse. |
| `sashimii transcript [ ]` | The transcript, one sentence per line with its source time and first and last word id, and every pause of 1 s or more. With two word ids, each word between them with its times. |
| `sashimii cut […]` | Adds a removal for each cut named by its first and last word; works out the frames. `--dry-run` writes nothing. |
| `sashimii edges [--no-pauses]` | Moves every cut edge onto the waveform, cuts pauses and wordless scraps, flags judgement calls. Run it last. |
| `sashimii pauses [--min ] [--json]` | The silences and breaths in the kept material, for deciding pauses yourself. |
| `sashimii agent-done ` | Removes `agent.json`, so the app says the draft is ready. |
| `sashimii new [--video ] [--audio \| --no-audio] [--style \| --no-style] [--no-cleanup]` | Sets up a project from a folder, as the app does. |
| `sashimii cleanup [--amount <0-100>] [--off]` | Turns voice cleanup on or off. |
| `sashimii render [--compatible] [--no-loudness] [--no-graphics]` | Renders a video project to MP4. One render at a time. A project with template graphics needs `--no-graphics`; the app renders those. |
| `sashimii export --editor resolve [--out ]` | Writes a DaVinci Resolve FCPXML bundle from the original media. |
| `sashimii export-wav [--out ]` | Writes an audio project’s cut as a WAV. |
| `sashimii install-skill` | Links the tool and installs or updates the skill. |
| `sashimii register …` | Registers Sashimii’s server with an agent, or prints the commands. |
| `sashimii style …` | An agent’s side of the Style studio. See the skill’s `references/styles.md`. |
## Drafting a Rough Cut
The steps, in order (the skill has the detail):
1. `sashimii info ""`. If the cut already has removals, ask before replacing them.
2. Write `agent.json` in the project: `{"agent": "", "task": "draft"}`. The app shows a banner while it exists.
3. Read the whole transcript with `sashimii transcript ""`, to the last line, before deciding anything.
4. Choose the cuts by the person’s rules first, then the default take rules: keep the last clean, complete take; cut stumbles, restarts and asides; cut the head and tail; cut nothing for length; when unsure, keep it and write a note.
5. Write every cut in one `sashimii cut` command. Kinds: `retake`, `false-start`, `stumble`, `aside`, `other`. Then write a note in `notes.json` for each judgement call.
6. `sashimii info`, then `sashimii edges ""` (with `--no-pauses` when the person wants pauses judged by their rules).
7. `sashimii agent-done ""`, also if you stop early.
8. Report the length before and after, the removals by kind, and your notes in listening order.
## Project Files
A project is a `.sashimii` folder of JSON files beside the recording. Finder shows it as one file; agents and the tool see a folder.
| File | What it holds | Who writes it |
| --- | --- | --- |
| `sashimii.json` | The media, frame rate, sync offset, Style and cleanup settings | The app, setup and `sashimii cleanup` |
| `transcript.json` | Every word with its times | Setup only |
| `edit.json` | The removals: everything outside an active removal is kept | The agent (through `sashimii cut`) and the app |
| `notes.json` | Notes and directions, each with a range, tags, text and author | The agent and the app |
| `agent.json` | Which agent is working, while it works | The agent only |
| `graphics.json`, `graphics/` | Graphics and their bundles | The agent and the app |
| `cache/`, `drafts/` | Waveform, cleaned audio, the last 100 versions of each file, earlier drafts | The app and the tool |
Rules for changing them:
- **The recording is read-only**, and so are `transcript.json` and `sashimii.json`.
- **For a draft, write only `edit.json`, `notes.json` and `agent.json`.** Write `graphics.json` and `graphics/` only when asked for graphics or when the project has a Style.
- **Write each file whole.** The app may be open. Read the file just before changing it, keep every `id`, and replace the file. The app reloads it and keeps the person’s unsaved changes on top.
- **Run `sashimii info` after each write** to `edit.json` or `notes.json`. It fails on a file that doesn’t parse, and the app won’t save over a file it can’t read. It doesn’t read `graphics.json`; follow the skill’s `references/graphics.md` for checking those.
- **Notes:** `text` is one line under 100 characters, the call you made and the alternative. `by` is `"agent"`. Tags come from: `pip`, `text`, `broll`, `custom`, `fullscreen`, `halfscreen`, `karaoke`, `chapter`, `zoom`. A handled note gets `"done": {"at": "", "by": ""}`.
## What Sashimii Doesn’t Do
So you don’t promise it to the person: Sashimii exports only to DaVinci Resolve (not Final Cut Pro or Premiere), doesn’t upload to YouTube, and has no pricing announced; the beta is free. Transcription and media processing run on the Mac, but the agent itself may send project information, including transcripts, to its provider.
## Reading These Docs as Markdown
Every page on this site has a Markdown version at its URL plus `.md`, for example [/docs/exporting.md](https://sashimii.app/docs/exporting.md). [/llms.txt](https://sashimii.app/llms.txt) lists every page; [/llms-full.txt](https://sashimii.app/llms-full.txt) has them all in one file; [/api/md/_catalog](https://sashimii.app/api/md/_catalog) lists them as JSON.
## Related
- [Keyboard Shortcuts](https://sashimii.app/docs/keyboard-shortcuts/)
---
# Style Studio
> Make a visual style for your videos by picking from options shown over your own footage, then let your agent design every graphic to match.
Canonical: https://sashimii.app/blog/style-studio/
Last updated: 2026-10-26
Published 26 October 2026.
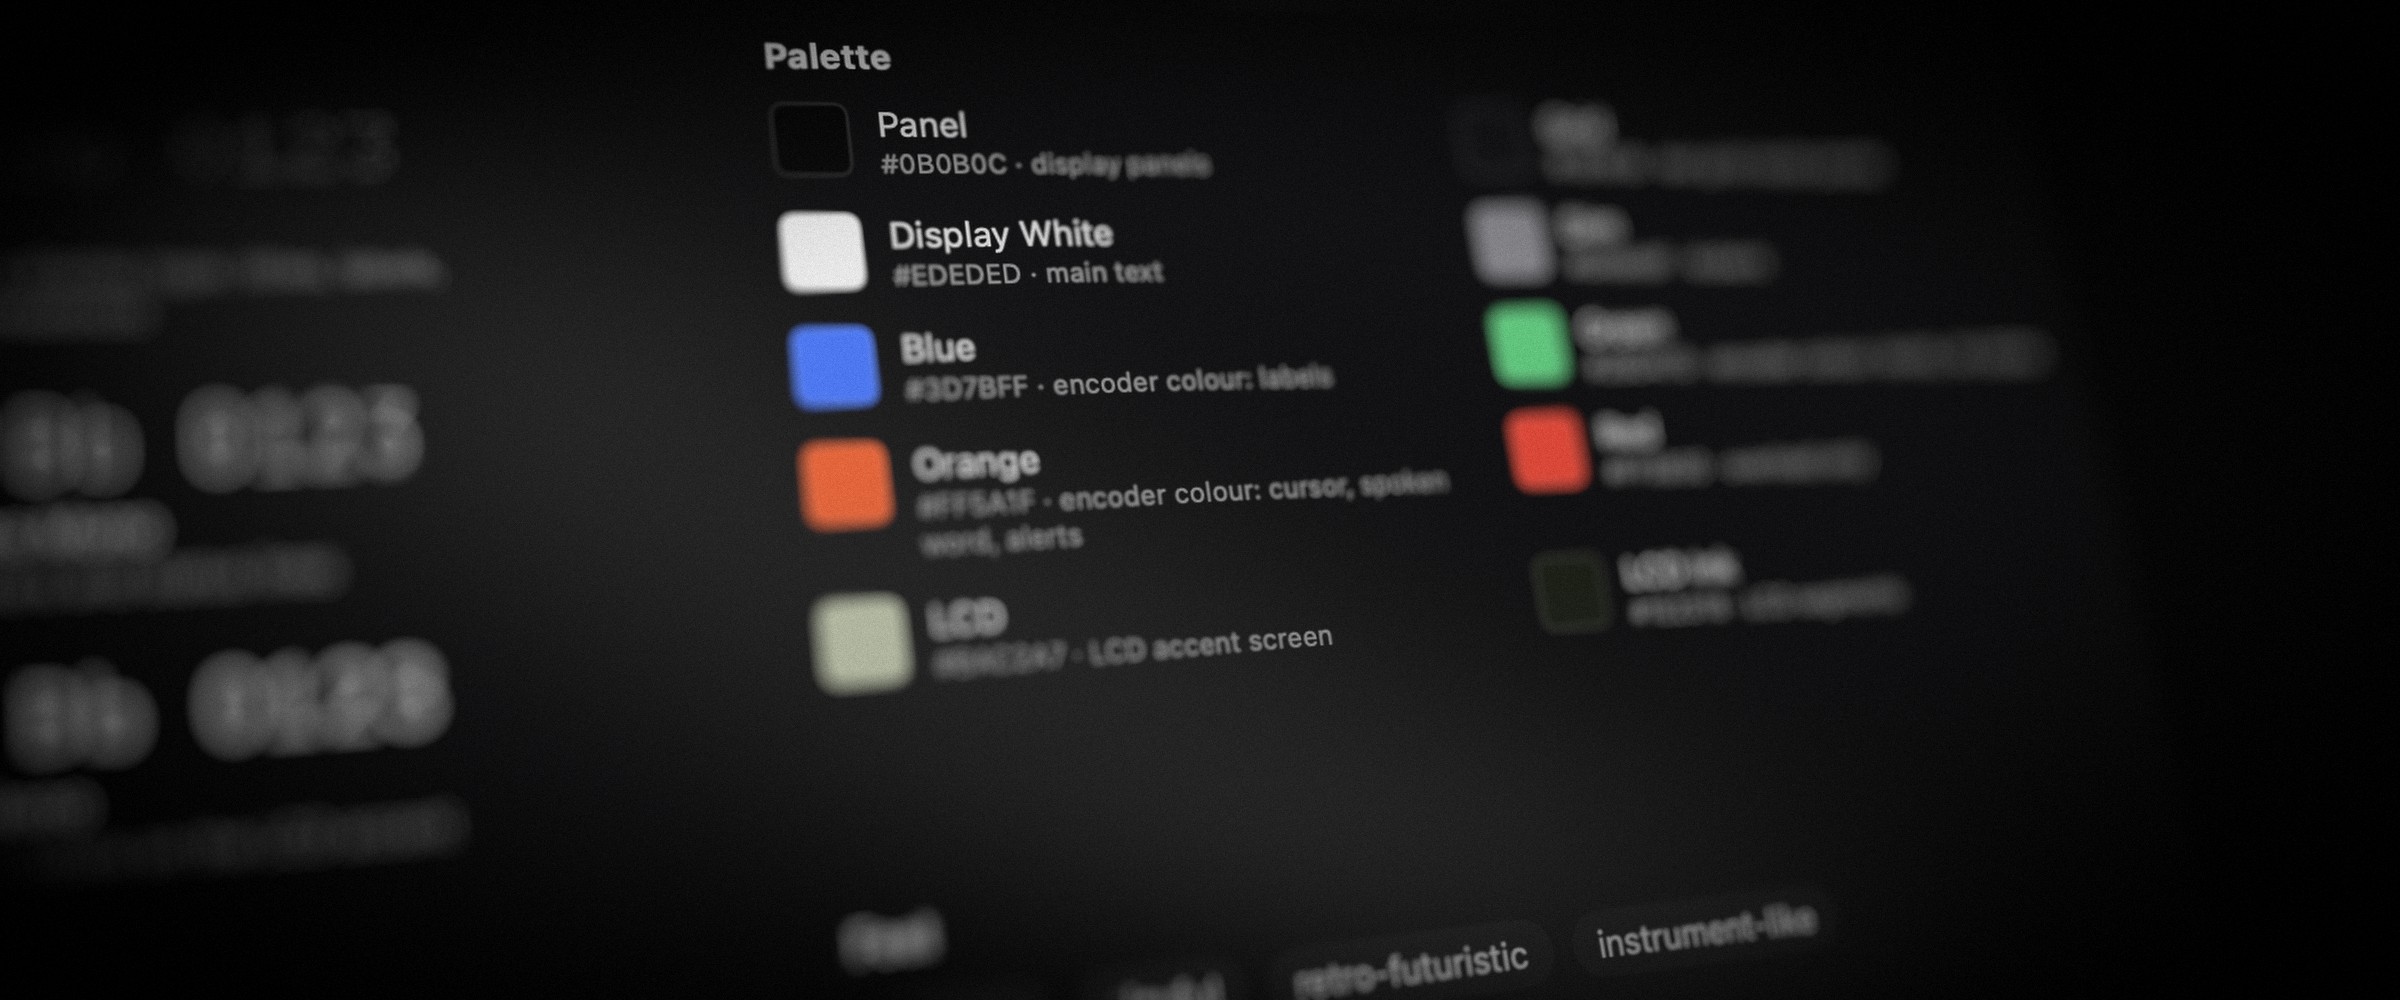
Graphics look best when they belong together. The Style studio helps you find a look for your videos, so every title, caption and graphic your agent makes from then on feels like part of the same channel.
## Why We Built It
Template packs give every video the same look as everyone else using them. Describing a style in words, one graphic request at a time, gives you something different every time. We wanted a way to settle on your own look once, by seeing it rather than describing it, and then have it carry through every project.
## What It Does
- **Start with a brief.** Describe the feel you're after in your own words. Add reference images, links, and any rules that must hold, like your brand colours or fonts.
- **Pick what you like.** Your agent shows you four complete styles, playing over your own video, not over a stock example. Choose the one closest to what you want, add a note, and it narrows down from there.
- **Approve a sample reel.** When you're close, you see a short reel of the style on your footage. Use it, or say what should change and get another take.
- **Use it everywhere.** A saved Style is there for every new project. Your agent designs each new graphic to match it, while still making whatever the video needs.
Your videos keep a look that's yours, without designing every graphic by hand.
## Related
- [All updates](https://sashimii.app/blog/)
---
# Cleaner Voice in One Switch
> Voice cleanup takes background noise and room echo out of your recording, on your Mac, with the original always one switch away.
Canonical: https://sashimii.app/blog/voice-cleanup/
Last updated: 2026-10-21
Published 21 October 2026.
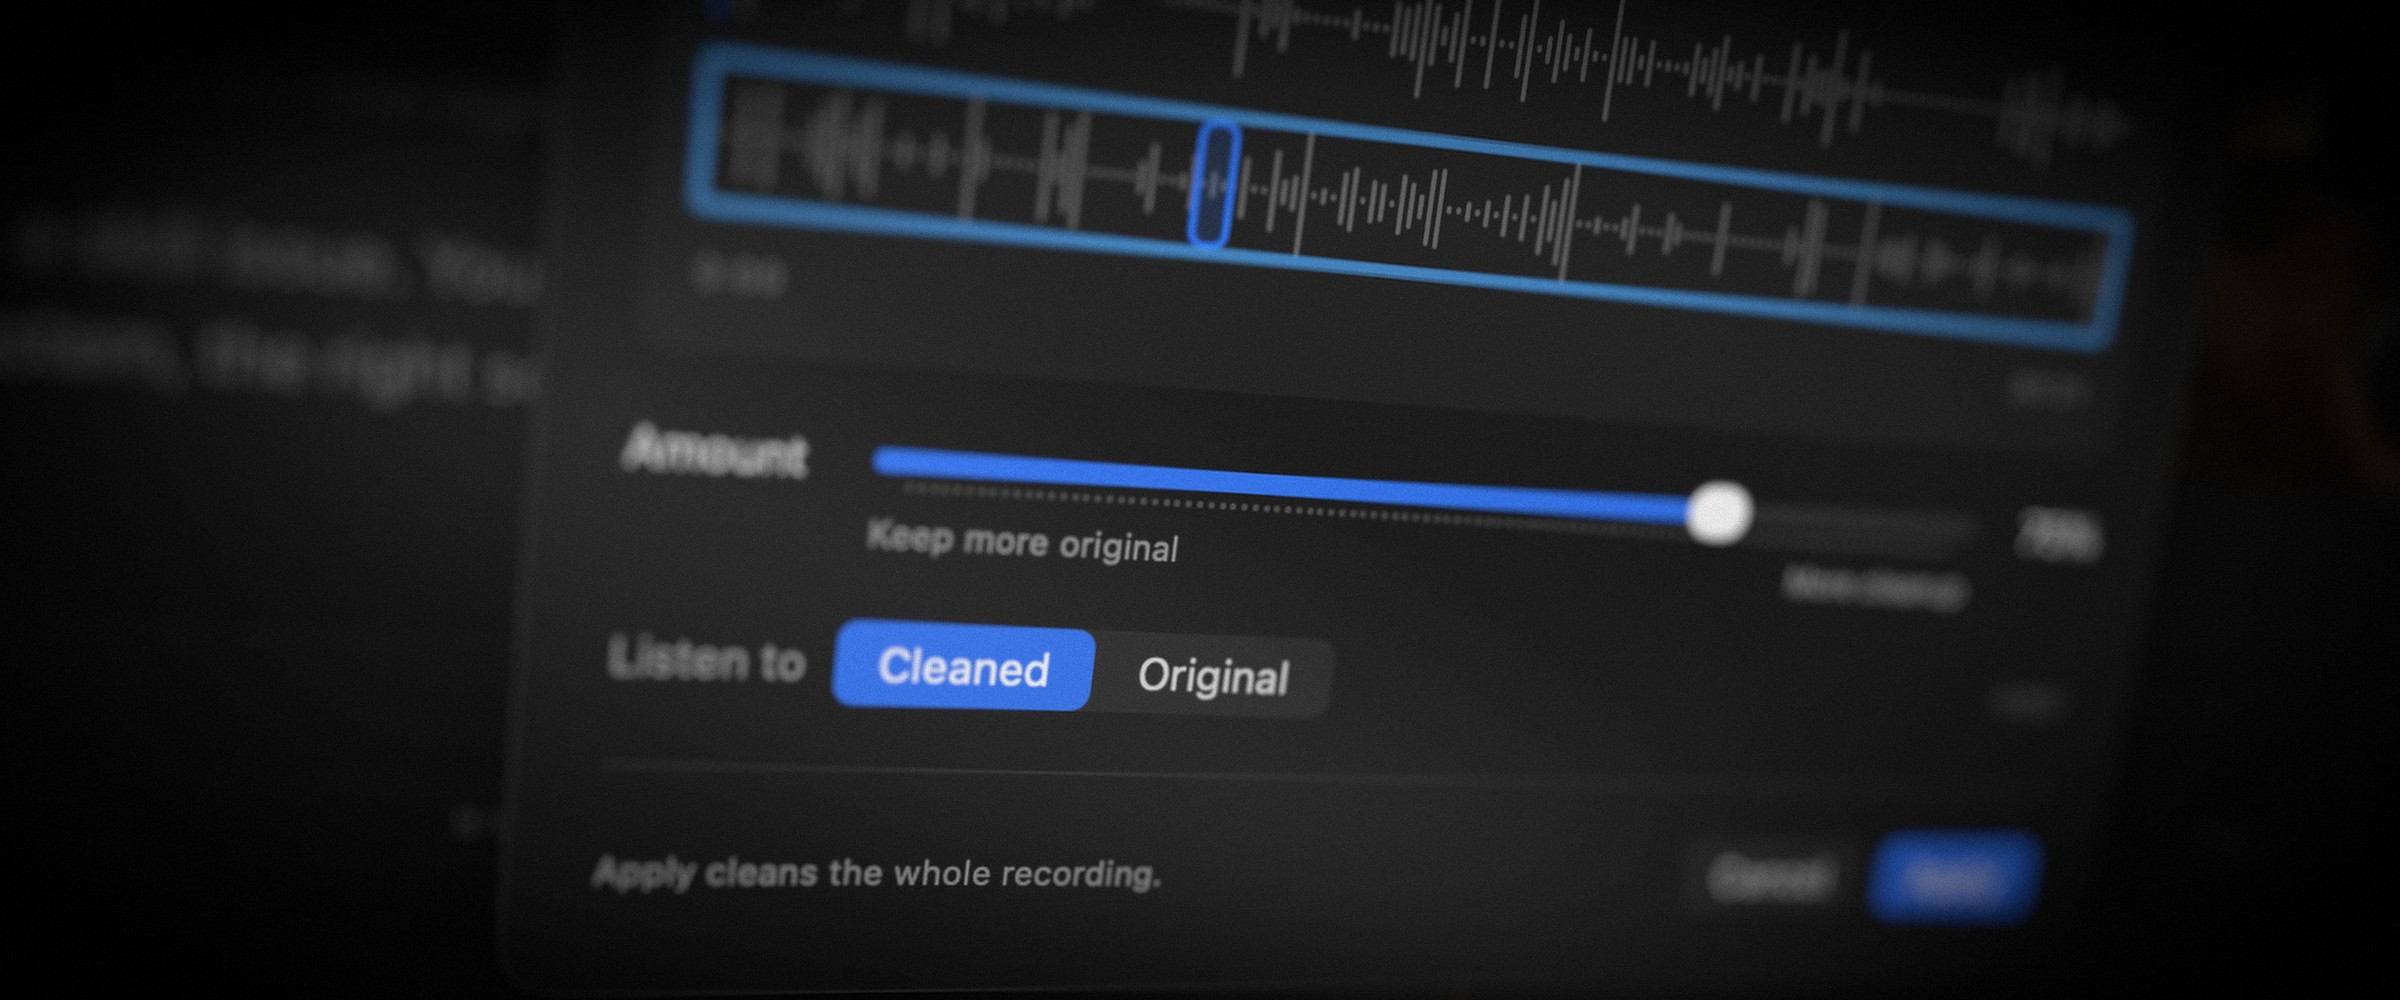
Not every recording happens in a treated studio. A noisy room, an echoey office or a mic set a bit too low shouldn't send you to a separate audio app before your video is ready to share. Sashimii can now clean up your voice for you.
## Why We Built It
Cleaning dialogue used to be a separate step at the very end, in a different app. That meant everything you watched and judged while cutting was the raw sound. We wanted the cleaned voice from the first listen, so the cut you approve is the cut people hear.
## What It Does
- **Cleanup from the start.** When you set up a new project, Clean up voice is already ticked. Sashimii cleans the recording on your Mac while it prepares the project.
- **One control.** A single Amount setting decides how strong the cleanup is. Light for a recording that's nearly there, strong for a noisy or echoey room.
- **Hear the difference.** Switch between the cleaned and original sound at any moment to check nothing important was lost. Some recordings are best left alone, and that's a valid answer too.
- **Used everywhere it matters.** Playback, your rendered video and your audio exports all use the cleaned voice. Your original recording is never changed.
The aim is a voice that sounds clear and natural, without turning into an audio engineering project.
## Related
- [All updates](https://sashimii.app/blog/)
---
# Notes: Talk to Your AI Agent From the Timeline
> Leave notes on the words in your video, and your own AI agent turns them into graphics, captions and zooms you can review and send back in Sashimii.
Canonical: https://sashimii.app/blog/notes-for-your-agent/
Last updated: 2026-10-20
Published 20 October 2026.
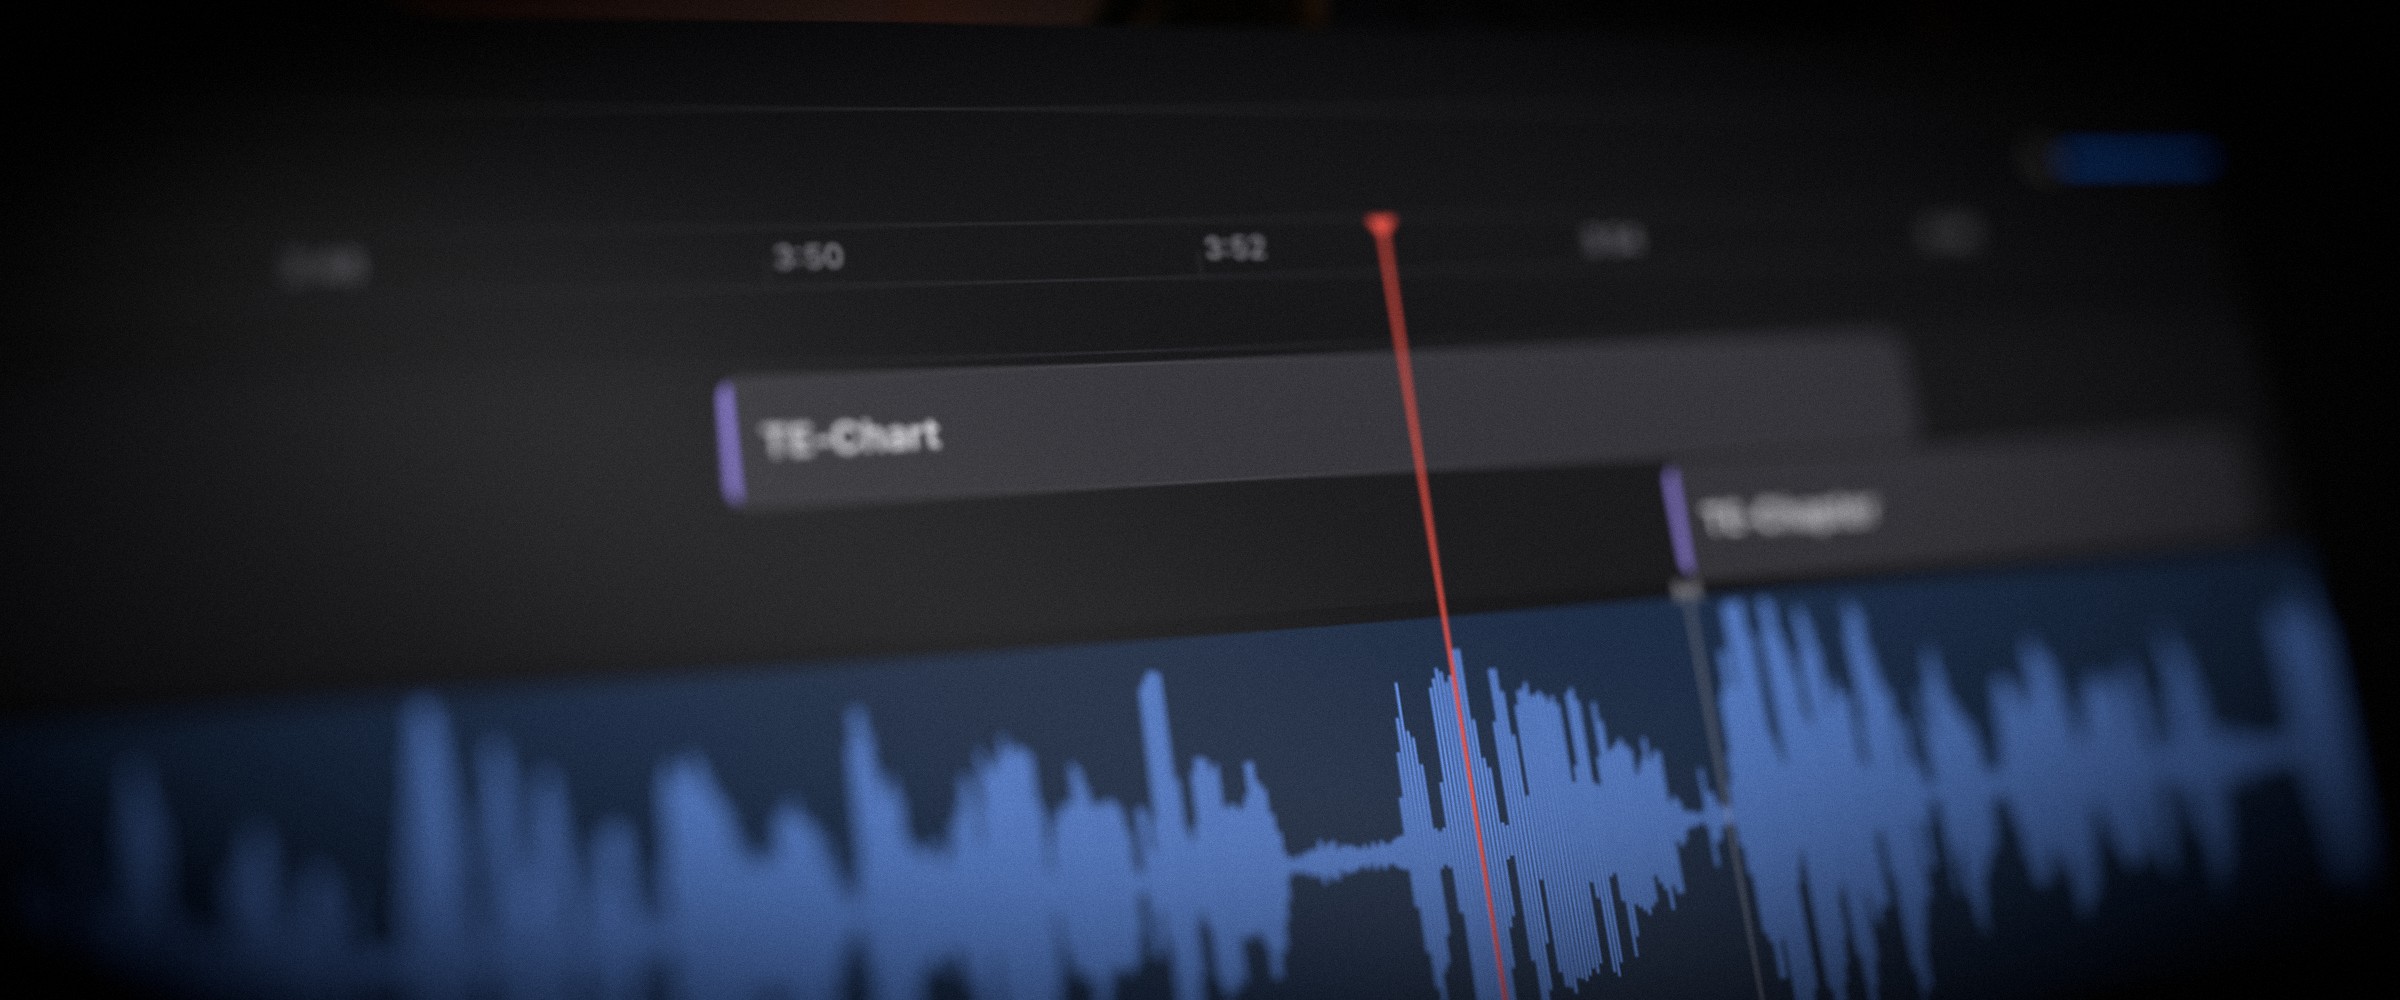
A rough cut is only half the edit. The other half is everything on screen: a title here, a zoom there, a graphic that explains the point you just made. Now you can ask for all of it while you watch, and your AI agent builds it.
## Why We Built It
Directing graphics usually means writing a list, switching to another tool, building each one by hand, then checking it against the video and starting over when it's off. We wanted that to happen in the same pass as the cut: watch once, say what you want where you want it, and review the results right where they play.
## What It Does
- **Notes on the words themselves.** Select some words, press N and say what should happen there. Tag it as text on screen, B-roll, a zoom, picture-in-picture, a chapter or a custom graphic. Dictation works too.
- **Your agent picks them up.** Sashimii works with the AI agent you already use, such as Claude Code or Codex. It reads your open notes and makes the graphics, animations and captions they ask for.
- **Review them in place.** Each graphic shows up on its own lane above the cut, at the moment it belongs. Play it back over your video, drag it to move or retime it, and press A to approve it.
- **Send feedback, not instructions from scratch.** If a graphic isn't right, leave a note on it. The note goes back to your agent with the graphic attached, and the new version replaces the old one on the lane.
You stay the director. The agent does the building, and every graphic stays editable until you say it's done.
## Related
- [All updates](https://sashimii.app/blog/)
---
# A Faster Way to Get the Rough Cut Right
> Sashimii started as one small tool with one job, getting the rough cut of a talking-head video right without a trip through a full editor.
Canonical: https://sashimii.app/blog/first-test-version/
Last updated: 2026-10-15
Published 15 October 2026.
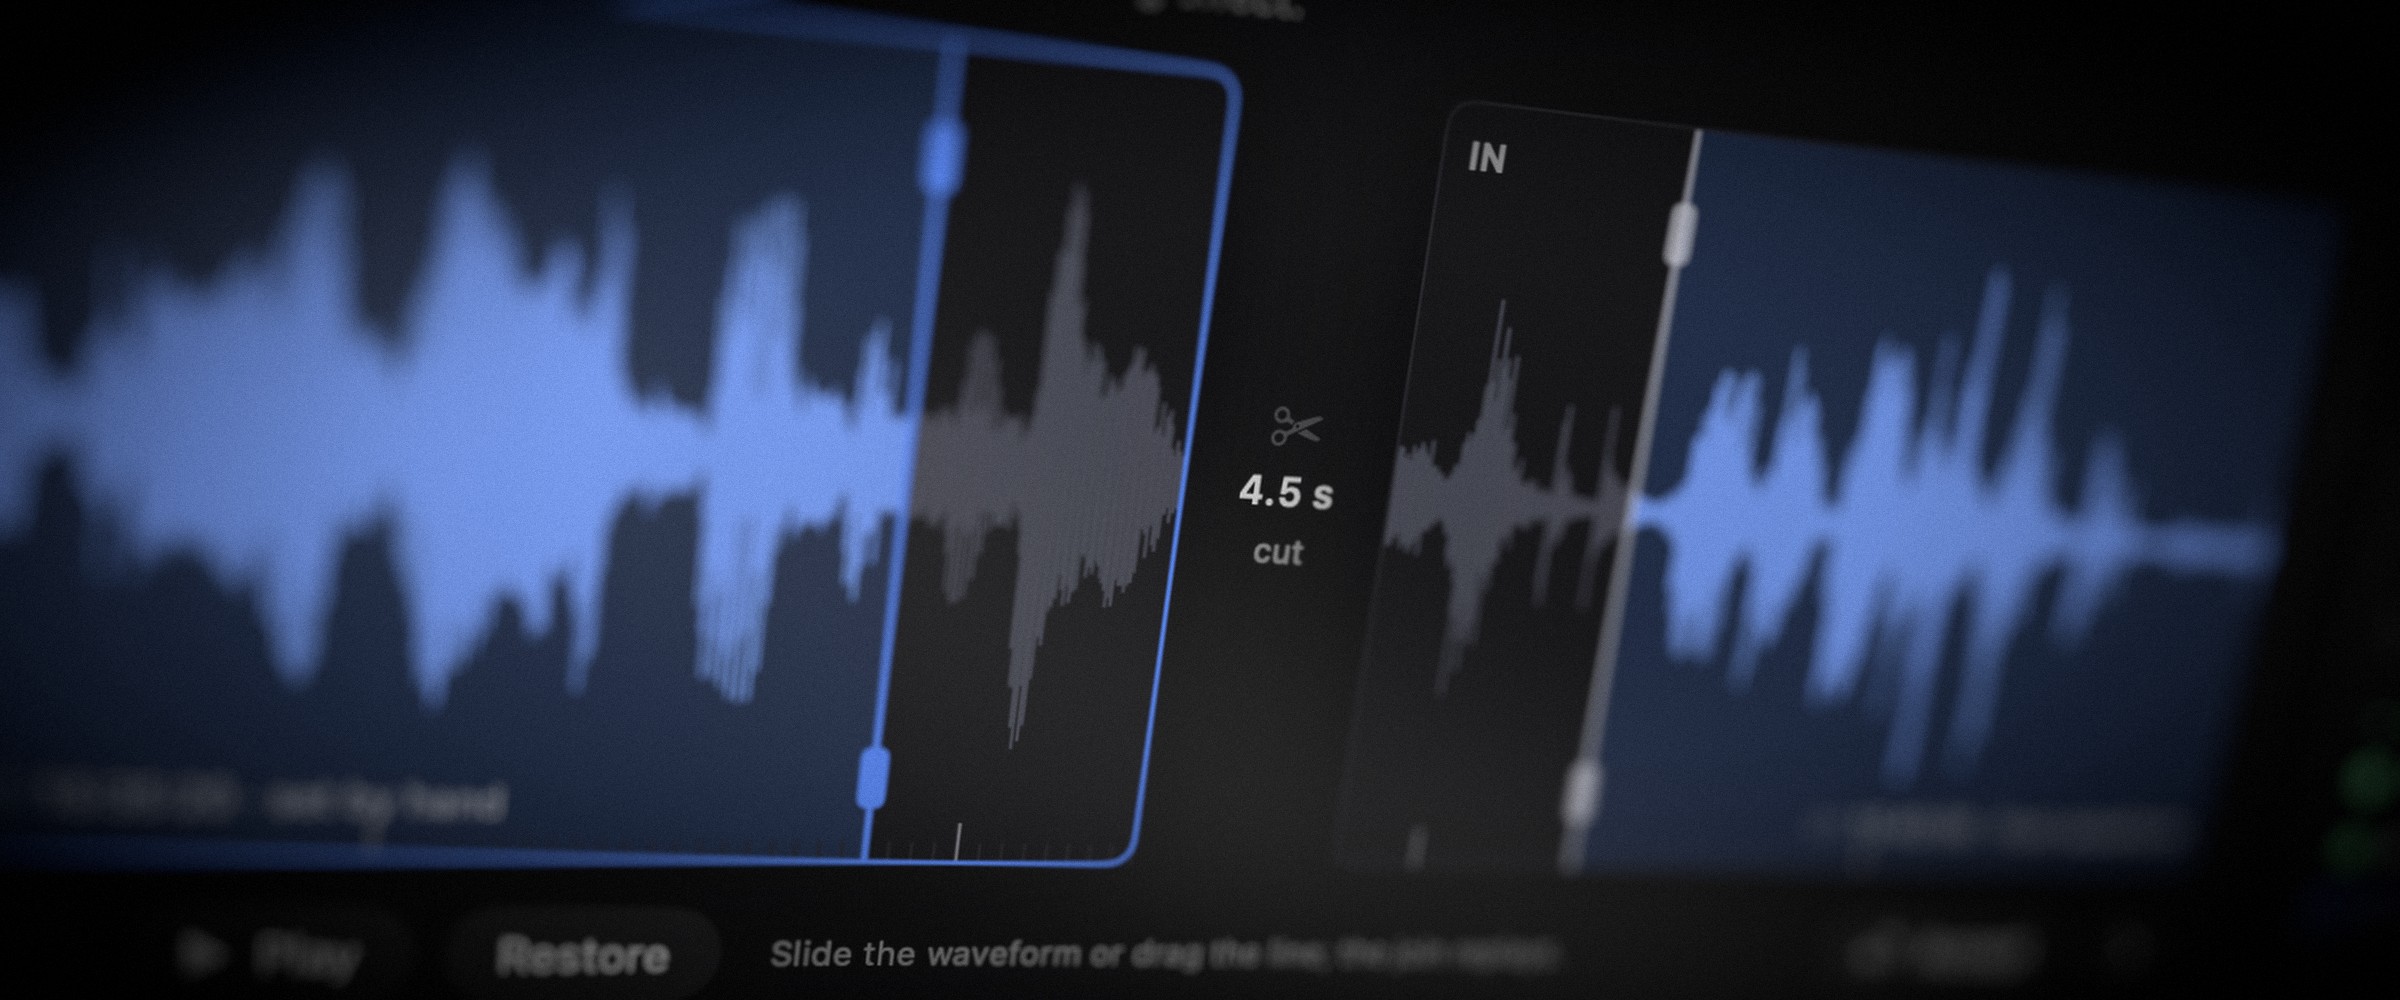
Sashimii began as a test build with a single job: take a talking-head recording, get it to a clean rough cut, and get every cut in it just right.
## Why We Built It
An AI agent can read a transcript and pick the good takes surprisingly well. That gets a rough cut most of the way there. The part that still eats an afternoon is the rest: a cut that clips the end of a word, a join that lands a moment too early, a pause that should have stayed. Fixing those in a full editor means hunting for each one on a timeline built for everything else.
So the first version did only this, and tried to do it fast.
## What It Does
- **Get your hands on the waveform.** Every join shows the sound on both sides of the cut. Slide the waveform or drag the cut line, and the join plays again straight away, so you hear exactly where it lands. That hands-on control is what we found missing in the AI editing tools we tried.
- **Read your video as text.** The recording shows as a transcript next to the picture. Cut words are struck through, so you can see what goes and what stays at a glance.
- **Check every join, one by one.** Join review steps through each cut in order. Play it, accept it with ↩, nudge it a frame either way, or bring the words back.
Your own agent does the first pass from the transcript. You do the last pass by ear, and nothing slips through because you looked at every join.
## Related
- [All updates](https://sashimii.app/blog/)
---
# Privacy Policy
> How Sashimii and sashimii.app handle your data.
Canonical: https://sashimii.app/privacy/
Last updated: 2026-10-30
Sashimii is built to keep your recordings on your Mac. This page explains what that means for the app and for this website.
Effective 30 October 2026.
## Who We Are
Sashimii is operated by whitesquare GmbH, Beckengässchen 1, 8200 Schaffhausen, Switzerland. This notice covers the Sashimii Mac app and sashimii.app. For privacy questions or requests, email [hello@sashimii.app](mailto:hello@sashimii.app).
## Recordings and Projects
Sashimii processes and transcribes recordings on your Mac. Its local editing and transcription do not upload your recordings, transcripts or project edits to us. The current app does not require an account.
You control your project files and any backups or copies you create. Deleting a project does not automatically remove copies held in your backup or other services.
If you connect an AI agent, it can read project information, including transcripts, and send it to its provider according to your instructions and the agent’s configuration. That processing is separate from Sashimii’s local transcription and is also covered by the provider’s privacy notice. Check what your chosen agent shares before using it with sensitive recordings.
## App Connections and Feedback
The app downloads its speech model from a model-hosting service when needed. The service receives ordinary request information, such as your IP address and the files requested; downloading the model does not upload your recordings.
Sashimii checks sashimii.app for updates and downloads them from there. The check sends the app’s name and version, along with ordinary connection information such as your IP address.
The current app does not send usage analytics, automatic crash reports or licensing requests to us.
If you send support messages or feedback, we receive the message and any information or attachments you choose to send. We use them to answer your request and investigate reported problems. Review attachments before sending recordings or personal information.
## Website and Beta Signup
If you apply for the beta, we collect your email address and the signup answers you provide, such as your Mac and AI-agent setup and an optional channel link. We use them to select and invite testers and send product updates. Our email provider stores signup information and sends the emails for us. You can unsubscribe from product updates using the link in those emails.
The website’s hosting and security providers process connection information, including IP addresses and request details, to deliver pages and protect against abuse. The website does not use visitor analytics or advertising cookies.
## Purposes, Providers and Retention
Where a legal basis is required, we use signup consent for product-update subscriptions, provide support and requested beta access as part of the service, and may rely on legitimate interests for security and investigating technical problems. Legal obligations can require records to be retained.
Hosting, email and download providers process information needed for their services. We may disclose information where required by law or necessary for legal claims. We do not sell personal information.
We keep beta applications while needed to select and manage testers, subscription details while needed to send requested updates or respect unsubscribe choices, and correspondence while needed to handle the request and related issues. Legal obligations or disputes may require some records to be kept longer. Technical logs follow the relevant service’s retention arrangements.
## International Processing
We are based in Switzerland. Our service providers process personal information in Switzerland, the European Union, the United Kingdom, the United States and other countries. Where a destination country does not offer adequate data protection under Swiss law, transfers are covered by standard contractual clauses in the provider’s data-processing terms or by the provider’s certification under the Swiss-US Data Privacy Framework. You can ask us for more information about these safeguards using the contact details above.
## Your Rights
Depending on applicable law, you may request access, correction, deletion, restriction or a portable copy of personal information, object to processing, and withdraw consent for future processing. Email us using the details above. We may need information to verify your identity and locate your records; legal obligations can limit deletion.
For local projects we do not hold, manage the files and backups on your Mac. You may complain to the Swiss Federal Data Protection and Information Commissioner or another competent data-protection authority.
## Changes
We will revise this notice when our practices change and provide any notice or obtain any consent required by applicable law.
---
# Beta Terms
> The terms for the free Sashimii beta.
Canonical: https://sashimii.app/beta-terms/
Last updated: 2026-10-30
The Sashimii beta is free. These are the few things to know before you use it.
Last updated 30 October 2026.
## Who Offers the Beta
The Sashimii beta is offered by whitesquare GmbH, Beckengaesschen 1, 8200 Schaffhausen, Switzerland (“we”). Questions go to [hello@sashimii.app](mailto:hello@sashimii.app).
## It’s Free
You don’t pay anything to use the beta.
## As-Is, No Warranty
The beta is unfinished software. We provide it as-is, without warranty of any kind. Expect bugs, and keep your own copies of recordings and projects you care about.
## Only the Beta
These terms cover the beta. They make no promise about a later version of Sashimii, what it will include or what it will cost.
## Your Data
How the app and this site handle your data is in the [privacy policy](https://sashimii.app/privacy/).